> For the complete documentation index, see [llms.txt](https://docs.dapta.ai/llms.txt). Markdown versions of documentation pages are available by appending `.md` to page URLs; this page is available as [Markdown](https://docs.dapta.ai/ai-text-agents/channels/connect-your-agent-with-whatsapp.md).
# Connect your Agent with WhatsApp
Connect a WhatsApp number to your Text Agent, step by step: from WhatsApp numbers in Dapta to Meta's window, then choose the agent, check a real customer gets a reply, and read each number's status.
This is the step where your agent stops being a demo and starts answering real people. It takes about five minutes: a few screens in Dapta, then Meta's own window, where you pick your business and your number.
## Before you start
Have these ready. Most failed connections are missing one of them.
* **A Text Agent you have already tested.**
* **Pop-ups allowed for `app.dapta.ai`.** Meta's window opens as a pop-up.
* **Admin access to your business on Meta.** You sign in with the Facebook account that manages your business portfolio.
* **A website or an Instagram Business profile URL.** Meta asks for one to avoid blocking the number.
* **The phone with the number.** If the number is already on the WhatsApp Business app, you scan a QR code with it. If it is not, you receive a verification code on it by SMS or call.
{% hint style="info" %}
**Bought a number from Dapta?** Our team connects it with you. On **WhatsApp numbers**, click **Book a session with Dapta** (or **Book a session** in the **Before you connect** dialog) and pick a time.
{% endhint %}
{% content-ref url="/pages/8yBxnycfBbLwmHztlM7I" %}
[Prepare your Meta account](/ai-text-agents/channels/prepare-your-meta-account.md)
{% endcontent-ref %}
## Connect the line
### In Dapta
**Step 1:** Go to **Text Agents → Channels** and, on the **WhatsApp** card, click **View Connections**. **WhatsApp numbers** opens.
***
**Step 2:** Start the connection.
* **Your first number:** the page shows the three steps ahead, **Connect with Meta**, **Choose your agent** and **Test it**, and **What you'll need**. Click **Continue with Meta**.
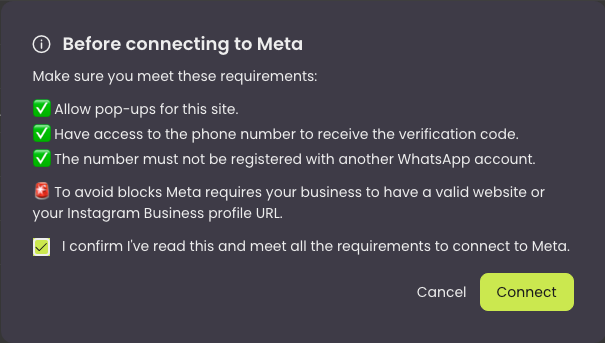
* **Another number:** click **Connect number**. The **Before you connect** dialog reminds you that you must be an admin of the business on Meta, and shows the two kinds of number you can pick in Meta's window. Click **Continue**.
| In Meta you choose | What it means |
| ---------------------------- | ------------------------------------------------------------------------------------------------------------------------------------ |
| **New number** | Not on WhatsApp yet. It works only in Dapta, and you verify it with an SMS or a call. |
| **WhatsApp Business number** | The one you already use in the app. You keep using it on your phone and your agent replies from the same number. You scan a QR code. |
Meta's window opens, and Dapta shows **Connecting your number** while you work in it. Keep the Dapta tab open. If you don't see Meta's window, check your pop-up blocker.
### In Meta's window
Meta shows its window in the language of your Facebook account. The screens below come from an account set to Spanish; the buttons are in the same place in every language.
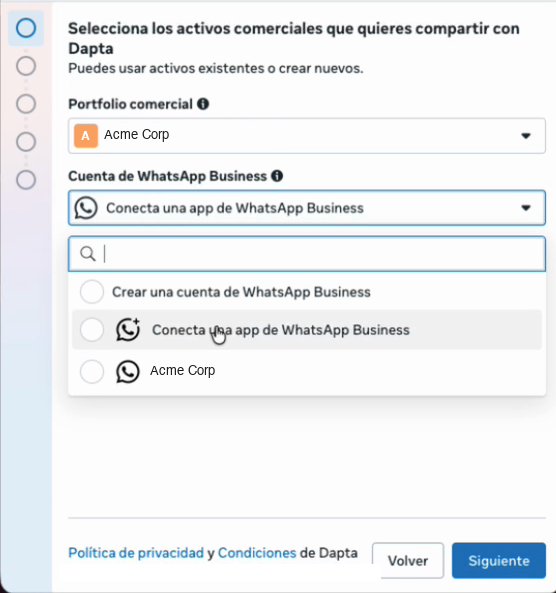
**Step 3:** Pick your **Business portfolio**. Under **WhatsApp Business account**, choose **Connect a WhatsApp Business app** to keep using the app on your phone, or **Create a WhatsApp Business account** for a number that is not on WhatsApp yet. Click **Next**.
Meta's window, in Spanish. "Conecta una app de WhatsApp Business" keeps the app on your phone.
***
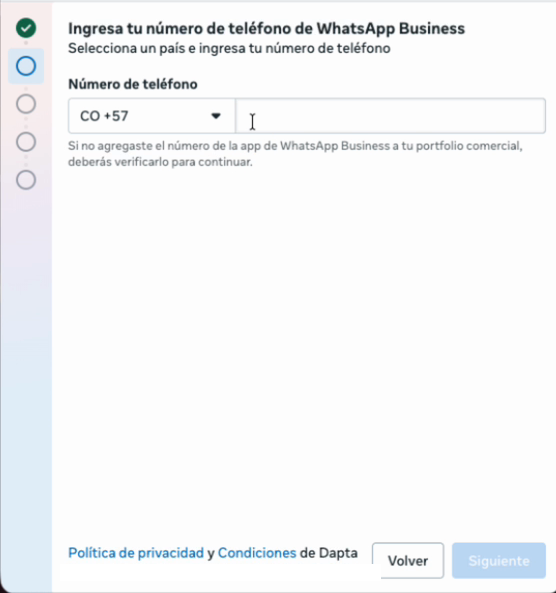
**Step 4:** Select the country and enter your phone number. Click **Next**.
***
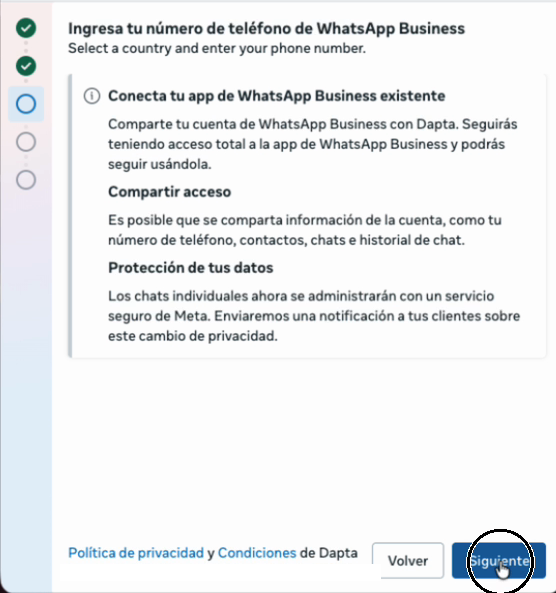
**Step 5:** If the number is on the WhatsApp Business app, Meta explains what connecting means: your team keeps full access to the app, and some account information is shared with Dapta. Click **Next**.
***
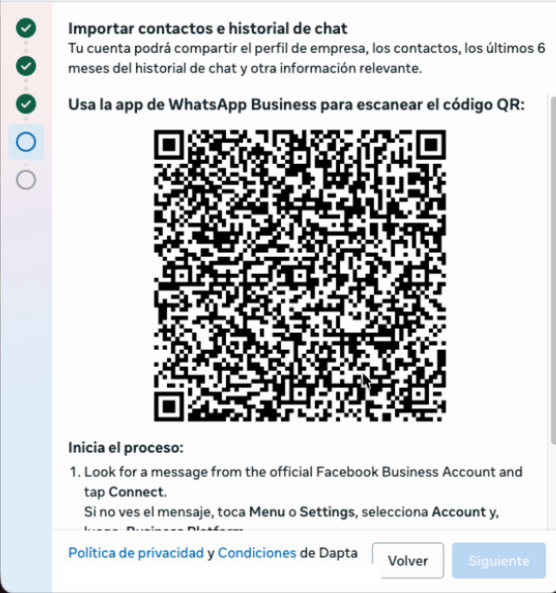
**Step 6:** Open the **WhatsApp Business app** on the phone and scan the QR code.
1. In the app, look for a message from the official Facebook Business account and tap **Connect**. If you do not see it, go to **Menu** or **Settings → Account → Business Platform**.
2. Choose whether to share your chat history. Meta can bring in your contacts and up to six months of chats.
3. If you cannot scan, use **Use access code** in Meta's window and type the code the app shows.
The QR code expires after a few minutes. If it does, click **Click to reload the QR code**.
***
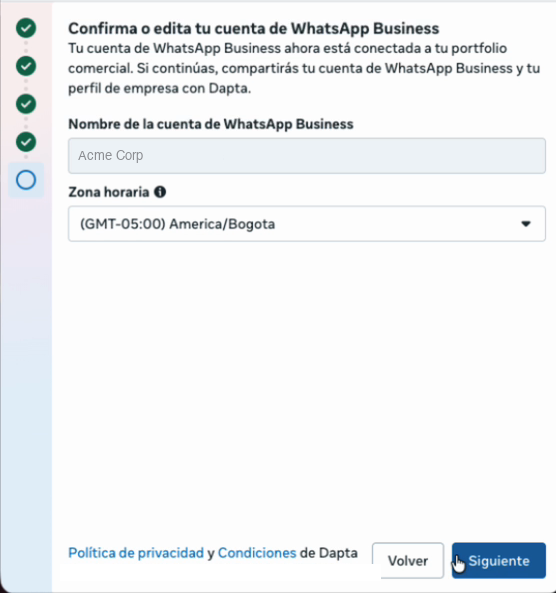
**Step 7:** Confirm the **WhatsApp Business account name**, choose your **Time zone**, and click **Next**.
***
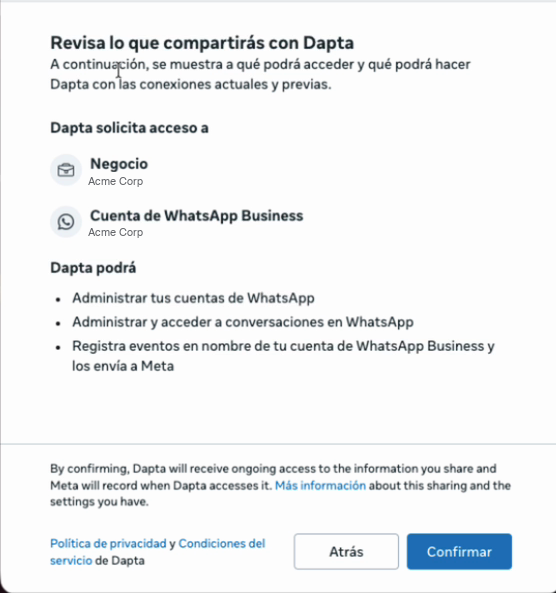
**Step 8:** Review what Dapta will be able to do (manage your WhatsApp accounts and their conversations) and click **Confirm**.
***
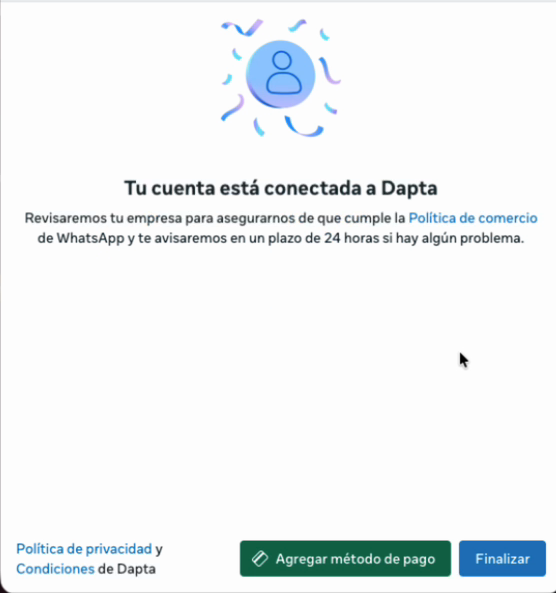
**Step 9:** Wait for **Your account is connected to Dapta**. Meta reviews your business against its Commerce Policy and tells you within 24 hours if there is a problem.
Click **Add payment method** to set up how Meta charges for delivering your messages, then **Finish**. Without a payment method on the WhatsApp Business account, your agent can't reply. See [Add a WhatsApp payment method](/ai-text-agents/channels/add-whatsapp-payment-method.md).
### Back in Dapta
**Step 10:** Wait for **Ready to use**. Dapta checks the number with Meta, then opens it so you can choose the agent that answers.
If Dapta says **Almost there**, Meta is still finishing the setup. Check the number again in a few minutes.
{% hint style="info" %}
Dapta charges for the agent, in credits. Meta charges for delivering each message on WhatsApp, to the payment method on your own Meta account. See [WhatsApp billing and Meta charges](/ai-text-agents/channels/whatsapp-billing-and-meta-charges.md).
{% endhint %}
{% hint style="warning" %}
Do not delete your WhatsApp account or remove the number from Meta to make a connection work. It destroys your chat history and almost never fixes anything. If a number is rejected, ask support what the real reason is first.
{% endhint %}
## Assign the agent
A connected line does not answer anybody until an agent is attached to it. These are two separate steps, and forgetting the second is the most common reason a new line stays silent.
Right after you connect, the number's details open. Under **Agent**, pick the Text Agent in **Choose an agent**. It saves as soon as you pick it. To change it later, click the number in the list.
Reassigning later changes who answers **new** conversations. It does not move existing chat history, and it does not necessarily switch the agent on conversations already running.
## Check it really works
Connected, assigned and actually delivering are three different things. Do all four checks before you put the number on your website.
| Check | How |
| ----------------------------------------- | --------------------------------------------------------------------------------------------------------------------------------------------------------------------------------------------------------------------------------------------------- |
| **The right number, the right workspace** | Confirm this is the line customers will message, in the workspace you meant. |
| **Registration finished** | In the list, **Agent replies** shows **Active**. **Setup incomplete** is not ready. |
| **An agent is assigned** | **Answered by** shows the agent you chose. |
| **A real reply arrives** | Open the number and use **Test this number**: scan the QR code with a different phone, or click **Open WhatsApp**, and send a message. Find the conversation in [Inbox](/ai-text-agents/inbox.md), and confirm the answer comes back to that phone. |
If you kept the WhatsApp Business app, your team can still reply from the phone. Those numbers carry a **Business app** chip in the list. Your team's messages from the phone show up in Inbox next to the agent's, as synced messages rather than something the agent wrote.
## What customers can send, and how your team answers
Customers can send text, photos, voice notes, videos, documents and stickers. Everything lands in the conversation in [Inbox](/ai-text-agents/inbox.md).
* The agent sees photos and understands voice notes when its model handles them. [Dapta Auto](/ai-text-agents/setting-up-your-text-agent/dapta-auto.md) does.
* For a video or a document, the agent reads the caption the customer wrote with it, not the file itself.
* Your team can take a conversation over and answer from Inbox, with text or attachments, inside WhatsApp's 24-hour window.
## Your numbers at a glance
**WhatsApp numbers** answers two questions for each number: does your agent answer it, and can you message customers first. Each row shows the **Number**, who it's **Answered by**, and two statuses, **Agent replies** and **Business-initiated**. When something is wrong, the row offers one button that fixes it, and the status explains why when you hover over it. Once you have more than five numbers, you can search and filter them.
**Agent replies**
| Status | What it means | What to do |
| -------------------- | ------------------------------------------------------------------------ | --------------------------------------------------------------------------------------------------------------------------------------------------- |
| **Active** | Your agent answers customers on this number. | Nothing. |
| **Needs an agent** | No agent answers yet, or the assigned agent is turned off. | **Choose agent** |
| **Setup incomplete** | The connection with Meta didn't finish. | **Continue setup** |
| **Paused** | You paused agent replies. | **Check & resume** |
| **Turned off** | The number is turned off in Dapta. | **Check & turn on** |
| **Reconnect needed** | Dapta lost access to the number in Meta, or Meta disconnected it. | **Reconnect** |
| **Needs a check** | Dapta hasn't checked the number with Meta yet, or the last check failed. | **Check now** |
| **Payment needed** | The WhatsApp Business account has no payment method. | **Add payment method**, in the banner above the list. See [Add a WhatsApp payment method](/ai-text-agents/channels/add-whatsapp-payment-method.md). |
| **Blocked by Meta** | Meta isn't letting the number send messages. | **Fix in Meta** opens WhatsApp Manager. |
**Business-initiated**
| Status | What it means |
| ----------------- | -------------------------------------------------------------------------------------------------------------------- |
| **Active** | You can message customers first with templates, from Sequences or Inbox. |
| **At risk** | Quality is dropping in Meta. Review your templates. |
| **Blocked** | A payment issue on the WhatsApp Business account, low quality in Meta, or Meta limiting the conversations you start. |
| **Not available** | Fix agent replies first. |
### The number's details
Click a number to open its details:
* **Finish setting up**: a checklist until the number is connected, has an agent and has received its first message. While the WhatsApp Business account has no payment method, **Add a payment method to the WhatsApp Business account** is one of the steps.
* **Agent**: **Choose an agent**, **Open agent**, **Remove agent**, and **Pause agent replies**.
* **Test this number**: a QR code and **Open WhatsApp**, once agent replies are working.
* **Quality in Meta**: **High**, **Medium**, **Low** or **Not rated yet**, based on blocks and reports from customers in the last 7 days. It starts low on a new number and rises as you send well.
* **Activity**: the last message received, the last reply delivered, and when the number was connected.
* **Advanced details**: the WhatsApp Business account, the connection type, and **Open WhatsApp Manager**.
* **Remove from Dapta**.
## Change or remove a line
Before you move or remove a line: pause any [Sequences](/ai-text-agents/campaigns.md) using it, deal with conversations still waiting on a reply, and tell whoever watches the Inbox.
* **To stop the agent for a while**, open the number and click **Pause agent replies**. Your agent stops answering on this number until you resume with **Check & resume**, which checks the number with Meta first.
* **To change the agent**, pick another one in **Choose an agent**.
* **To remove the number**, open it and click **Remove** under **Remove from Dapta**. Your agent stops answering on the number and your sequences can't use it. Conversations are kept, and nothing changes in Meta or in the WhatsApp app. If active sequences still use the number, finish or cancel them first.
Removing a line in Dapta and deleting the registration at Meta are not the same thing — never do the second to achieve the first.
## If something is not working
| What you see | What to try |
| --------------------------------------------------- | ---------------------------------------------------------------------------------------------------------------------------------------------------------------------------------------------------------------------------------------------------------------- |
| Meta's window never opens | Allow pop-ups for `app.dapta.ai` and start again from **Continue with Meta** or **Connect number**. |
| The QR code expired | Click **Click to reload the QR code**, or use **Use access code**. |
| "Number already registered" | The number is connected to WhatsApp somewhere else. Check with support before changing anything. |
| **Almost there**, or **Setup incomplete** | Meta is still finishing the setup. Check the number again in a few minutes, or click **Continue setup**. If it stays, send support the number, the time and the status shown. |
| Connected, but no reply | Check **Agent replies** for the number: its status and button tell you what is missing. Also check the agent is published, that a human has not taken the conversation over in Inbox, and that you are messaging from a different number than the one connected. |
| Replies work, but messages you start do not | Check **Business-initiated** for the number. You also need an approved template for that line. See [which template type you need](/ai-text-agents/channels/template-types.md). |
| **Agent replies are blocked: add a payment method** | The WhatsApp Business account has no payment method. Click **Add payment method**, or follow [Add a WhatsApp payment method](/ai-text-agents/channels/add-whatsapp-payment-method.md). |
| Messages suddenly stop | Check the number's statuses in **WhatsApp numbers** first. If they look fine, check your messaging limit in WhatsApp Manager. |
Do not reconnect repeatedly to get around a quality, payment, verification or template restriction — it does not clear them, and it puts the number at risk.
{% content-ref url="/pages/mLlFi104TPasFu4fCFKM" %}
[Which template type do you need](/ai-text-agents/channels/template-types.md)
{% endcontent-ref %}
{% content-ref url="/pages/4UzZiIFvS8tHwW343c2h" %}
[WhatsApp billing](/ai-text-agents/channels/whatsapp-billing-and-meta-charges.md)
{% endcontent-ref %}
---
# Agent Instructions
This documentation is published with GitBook. GitBook is the documentation platform designed so that both humans and AI agents can read, navigate, and reason over technical content effectively. Learn more at gitbook.com.
## Querying This Documentation
If you need additional information that is not directly available in this page, you can query the documentation by asking a question.
Perform an HTTP GET request on the following URL with the `ask` and `goal` query parameters:
```
GET https://docs.dapta.ai/ai-text-agents/channels/connect-your-agent-with-whatsapp.md?ask=&goal=
```
`ask` is the immediate question: it should be specific, self-contained, and written in natural language.
`goal` is what the user is ultimately trying to achieve, the reason they need the answer. Sharing it helps GitBook give you a better, more relevant answer. A goal is most helpful when it describes the outcome the user wants rather than restating the question. For example, with `ask=how do I create an API token`, a goal like `automate deployments from our CI pipeline` lets GitBook tailor the answer to that use case.
The response will contain a direct answer to the question and relevant excerpts and sources from the documentation.
Use this mechanism when the answer is not explicitly present in the current page, you need clarification or additional context, or you want to retrieve related documentation sections.