> For the complete documentation index, see [llms.txt](https://docs.dapta.ai/llms.txt). Markdown versions of documentation pages are available by appending `.md` to page URLs; this page is available as [Markdown](https://docs.dapta.ai/ai-voice-agents/agent-actions/transfer-call.md).
# Transfer Call
Route calls to a predefined number or dynamic condition, choose cold, warm or agentic warm transfers, restrict them to business hours and pass context in SIP headers.
The "Transfer Call" function in Dapta allows you to transfer phone calls flexibly and in a personalized manner, either to predefined numbers or based on dynamic conditions according to the context of the conversation. You can choose between cold transfers (without context), warm transfers (with a previous summary) or agentic warm transfers (a screening agent talks with the destination first), and configure how the phone number is displayed to the agent receiving the call. This function is ideal for efficiently directing users to the appropriate resource, whether it's a human agent, support, sales, or any other department, ensuring a seamless experience tailored to their needs.
### Step-by-Step Guide
#### Step 1: Select your Agent
* Navigate to the list of agents and select the agent to which you want to add the call transfer instruction.
#### Step 2: Access the Configuration
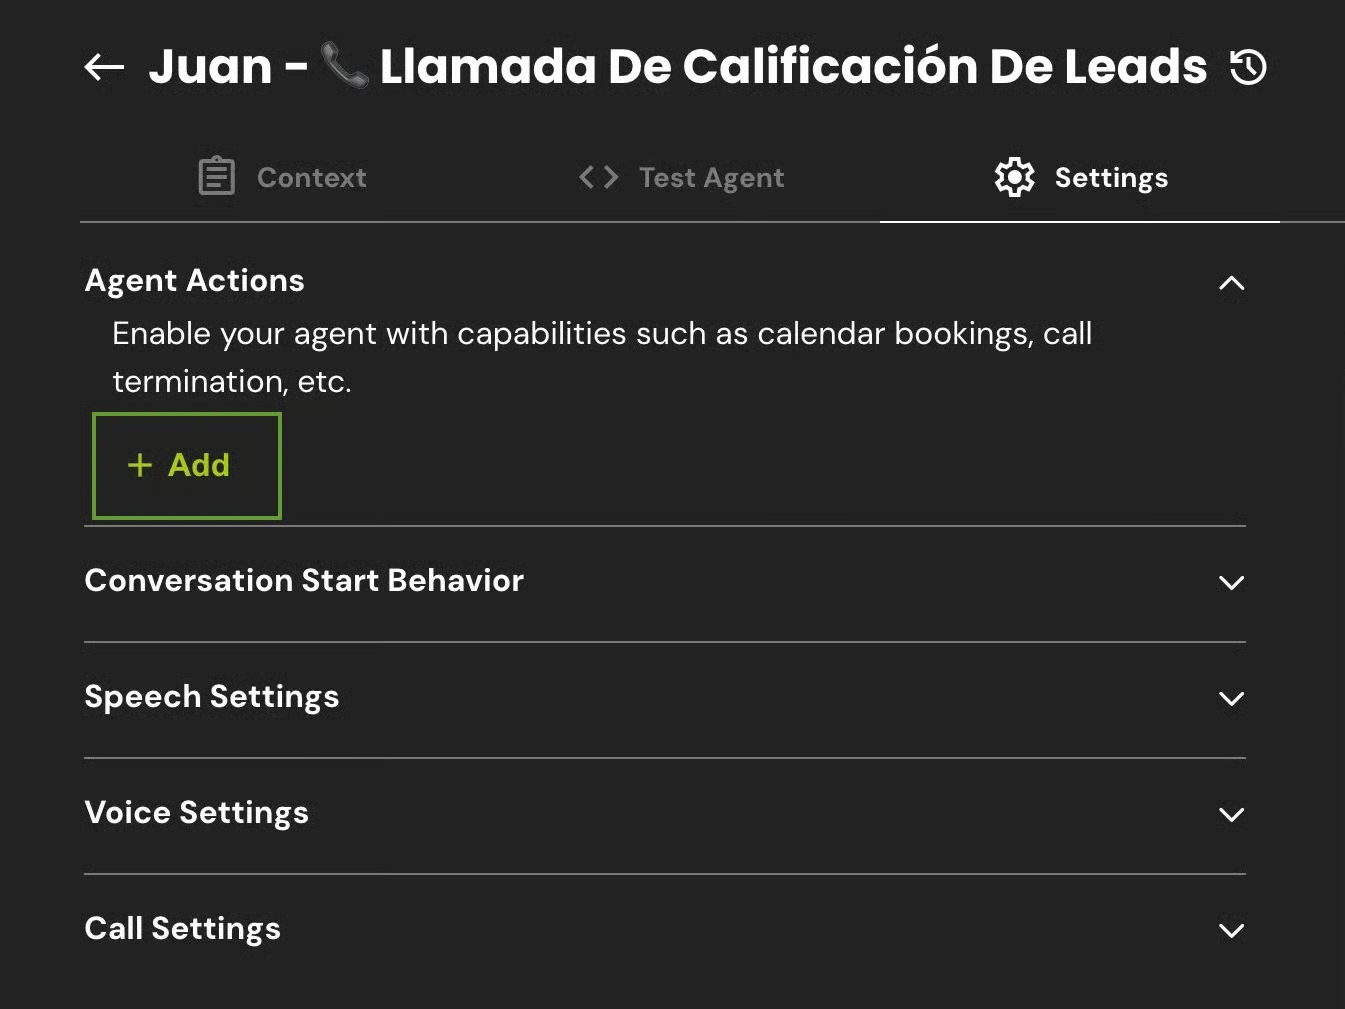
* Once inside the agent, go to the **Settings** tab.
* Within Settings, click on **Agent Actions** to access the available actions for your agent.
#### Step 3: Add the Call Transfer Function
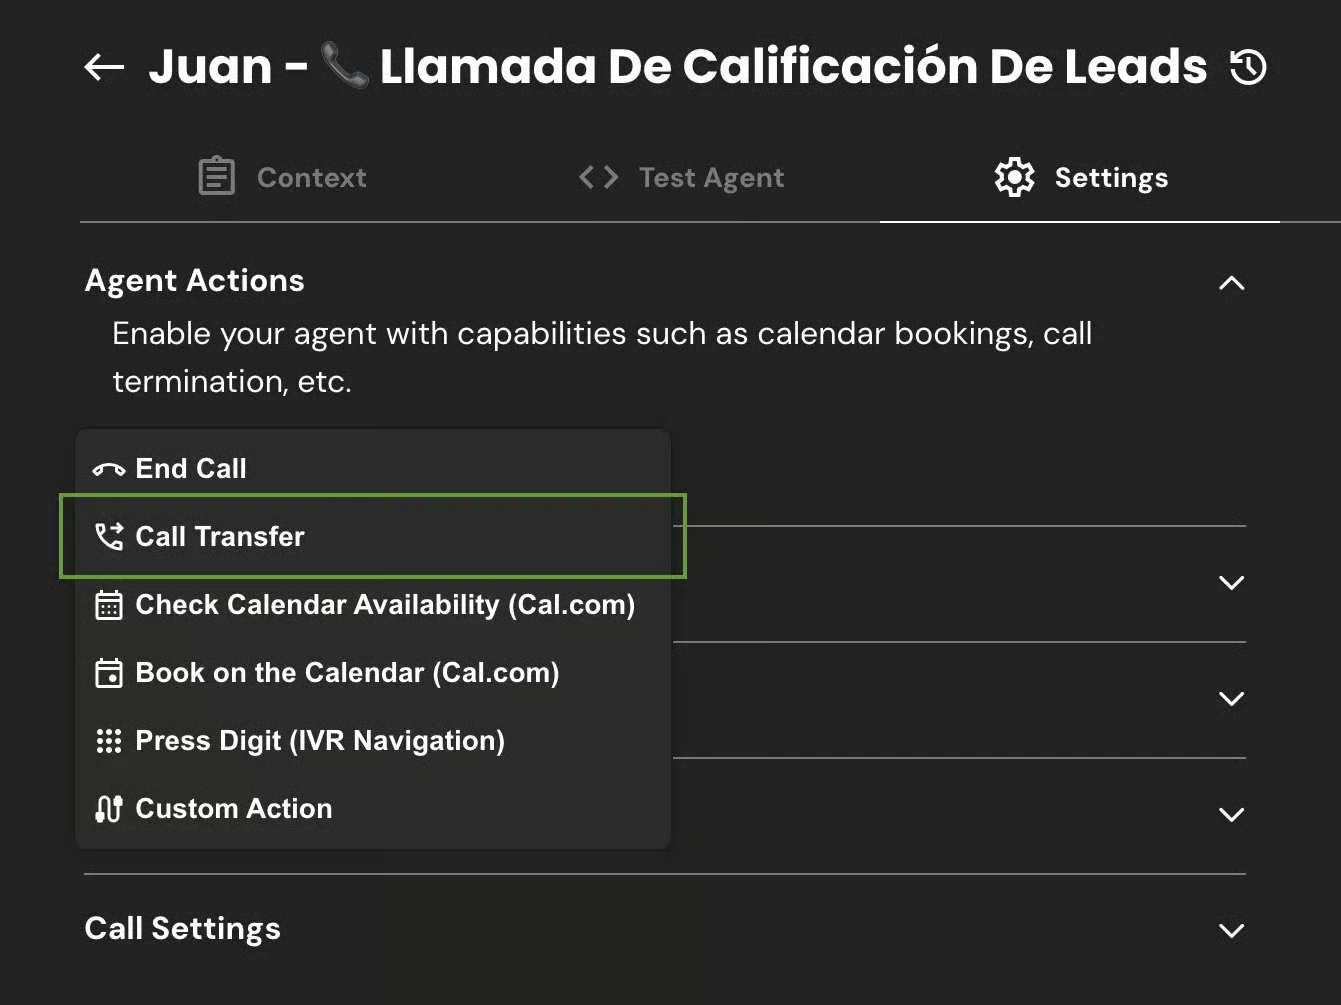
* A menu with available options will appear. Click on **Add** and then select **Transfer Call** from the list of options.
#### Step 4: Configure your Instruction
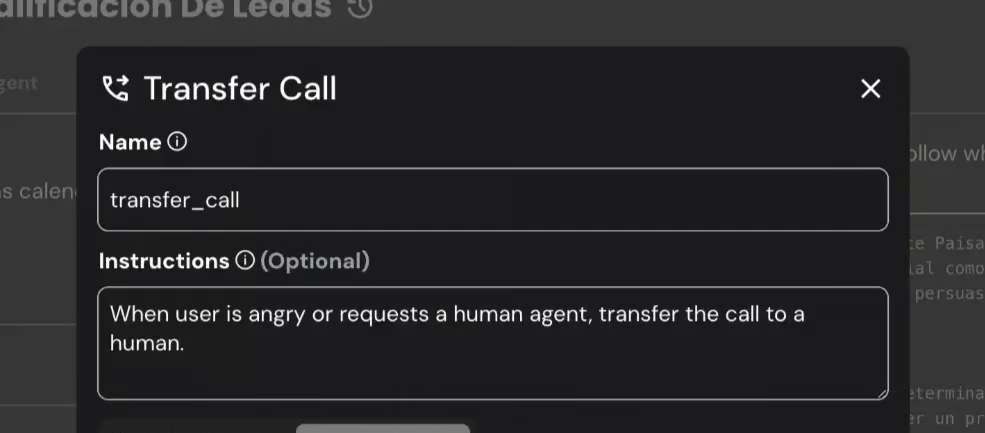
* Assign a descriptive name to your function in the "Name" field and write the specific instruction about when to use this function. According to the example, the instructions could be: "When the user is angry or requests a human agent, transfer the call to a human.”
#### Step 5: Define the Function
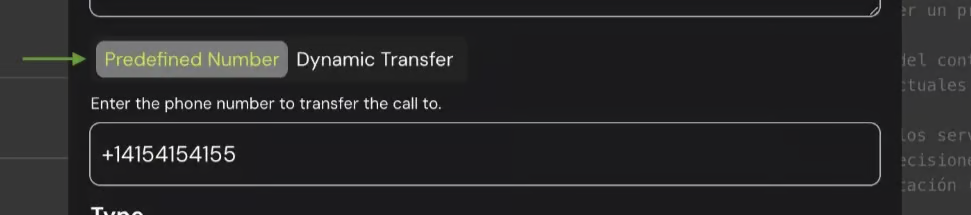
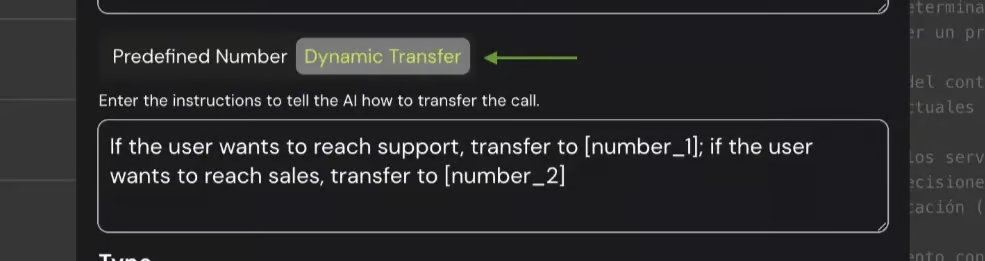
* "Predefined Number": Enter the phone number to which the call will be transferred.
* "Dynamic Transfer": Select this option to provide instructions to the AI on how to dynamically transfer the call. In the example, the instructions are: "If the user wants to reach support, transfer to \[number\_1]; if the user wants to reach sales, transfer to \[number\_2].
#### Step 6: Transfer Type
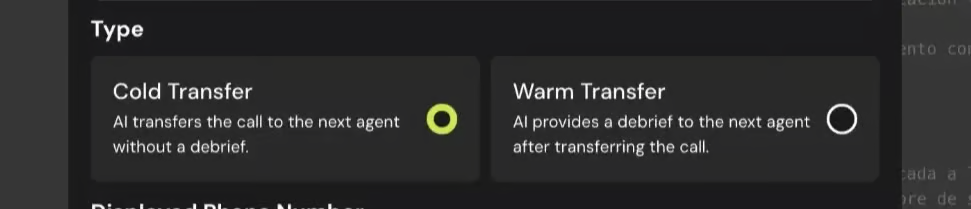
Under **Type**, select how the call is handed over:
* **Cold Transfer**: transfers the call to the next agent without a debrief.
* **Warm Transfer**: gives the next agent a debrief of the situation, then connects the caller.
* **Agentic Warm Transfer**: a screening agent calls the destination first, talks with the person who answers and decides whether to connect the caller.
**Warm Transfer through a phone menu.** If the destination answers with an automated menu ("press 1 for…"), turn on **IVR Navigation** (**Enable IVR navigation with a custom prompt**) and describe in **IVR Prompt** which options to press, for example: "Press 2 for sales, then 1 for new customers." The agent listens to the menu, presses the options you describe and gives its debrief once a person answers. IVR navigation works while **Enable human detection** is on.
**Agentic Warm Transfer.** The screening agent is a voice agent of its own: its prompt tells it how to talk with the person who answers and when the call should go through. Choose it in **Two-way Conversation Agent** (**Select Transfer Screening Agent**), or click **Create Transfer Agent** to make one. Then set:
* **On Hold Music** and **Transfer Ring Duration** (10 to 120 seconds): what the caller hears while waiting, and how long the destination rings.
* **Wait time for agent answer** (10 to 300 seconds, 180 by default on new transfers): how long the screening agent has to decide, counted from the moment the destination answers.
* **Action on Timeout**: when that time runs out, **Cancel Transfer** or **Bridge Transfer** (connect the caller anyway).
* **Record the conversation with the advisor**: saves the audio of the screening call, before the caller is connected. It is billed as an additional recording.
Before it starts talking, the screening agent works out who answered:
* It waits through hold-queue messages ("high call volume, your wait may be…"), hold music and automated surveys, instead of treating them as voicemail, and stays on the line until a person answers or the wait time runs out.
* If the line stays silent or it can't tell whether it hears a person, it says "Hello?" (at most twice, at least 4 seconds apart), so someone who picked up without speaking isn't lost.
* It cancels the transfer when it reaches a voicemail, or a recording saying nobody is available, the office is closed or to call back later.
* If the destination answers with a phone menu, add a **Press Digit (IVR Navigation)** action to the screening agent and describe in its prompt which options to press.
When the transfer isn't connected, your agent stays on the call and keeps helping the caller. Each agentic transfer shows its **Screening conversation** in the call log: what the screening agent and the person who answered said, plus the audio when recording is on.
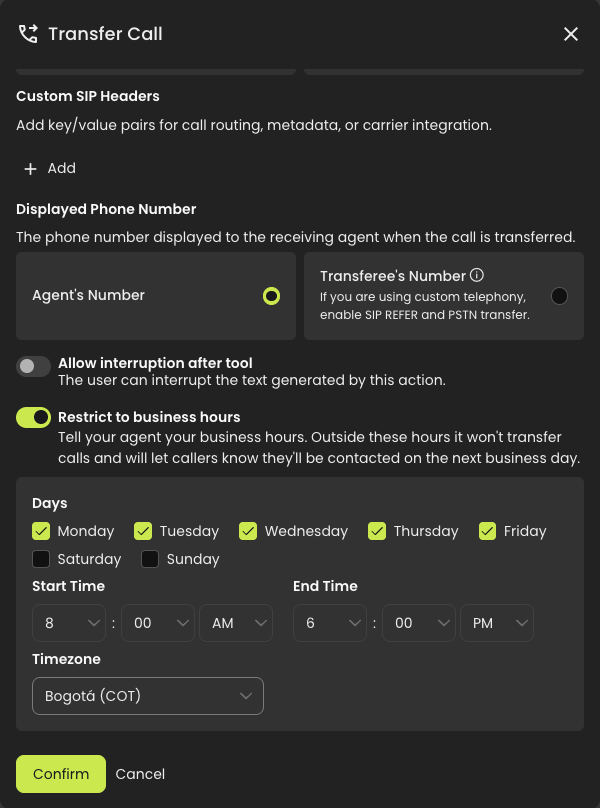
#### Step 7: Displayed Phone Number
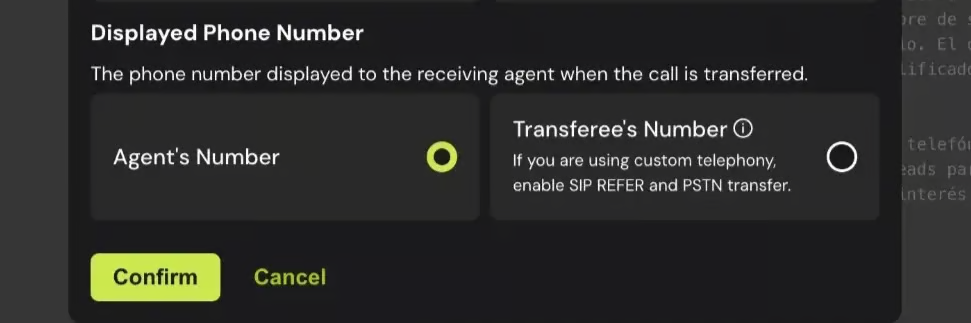
Choose how the phone number will be displayed to the agent receiving the transferred call:
* "Agent's Number": Displays the number of the agent transferring the call.
* "Transferee's Number": If you use custom telephony, enable SIP REFER and PSTN transfer. Keep in mind that you must configure the following in your telephony provider in order to make it work, because this option is internally simply the transfer via SIP REFER, and some telephony providers have the ability to set the caller ID for SIP REFER.
#### Step 8: Restrict to Business Hours (Optional)
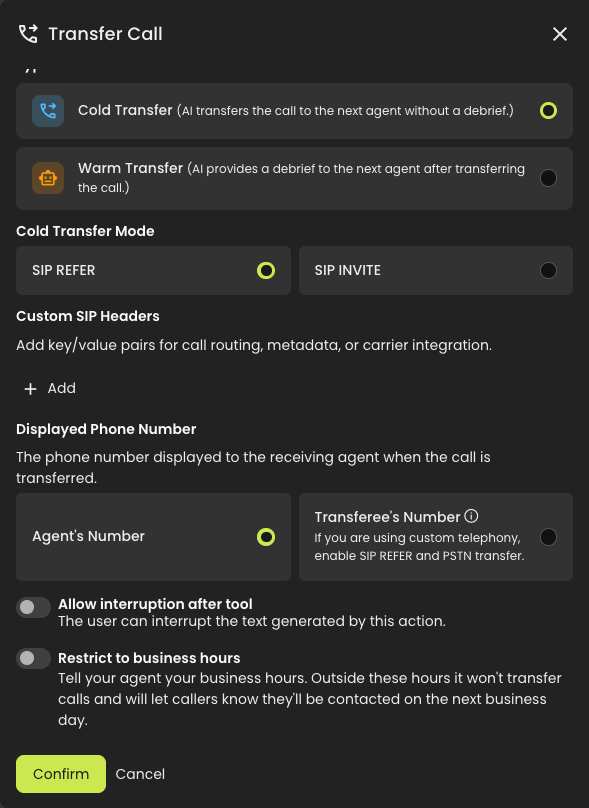
If you only want your agent to transfer calls during your team's working hours, enable the **Restrict to business hours** toggle at the bottom of the Transfer Call configuration.
When enabled, you can define your availability:
* "Days": Select the days of the week when your team is available to receive transferred calls.
* "Start Time" / "End Time": Set the time window during which transfers are allowed.
* "Timezone": Choose the timezone your schedule refers to.
During a call, the agent automatically knows whether the current time falls inside your business hours:
* **Within business hours**: transfers work normally.
* **Outside business hours**: the agent will not transfer the call under any circumstances.
If the toggle is off, the agent behaves exactly as before — transfers are available at any time.
{% hint style="info" %}
This option is available for agents using Dapta's native telephony or a connected SIP trunk.
{% endhint %}
***
### Custom SIP headers
Just above **Displayed Phone Number**, the Transfer Call configuration has a **Custom SIP Headers** section: key/value pairs that Dapta adds to the transfer, so the phone system that receives the call gets context along with it, such as a customer ID, a queue name or a summary of the conversation. Click **Add**, type the header name (for example `X-Customer-Id`) in the first field and its content in **Value**. The headers are sent with every transfer type and cold transfer mode.
The value is resolved at the moment of the transfer:
* A value written with double curly braces, such as `{{customer_id}}`, is filled from the call's variables: any dynamic variable of the call, and the reserved ones such as `{{user_number}}`.
* A variable whose name ends in `-transfer`, such as `{{call_summary-transfer}}`, is written by the agent itself at the moment it transfers, from what was said in the conversation. It adds no delay to the transfer. To tell the agent what to write, add a line to its prompt with the variable, a colon and your instruction, for example `{{call_summary-transfer}}: a one-line summary of what the caller needs`. The value is a single line of plain text of up to about 300 characters. If the call starts with a dynamic variable of that same name, that value is used instead. Variables that start with `sip_header_` are never filled this way, and names that end in `_transfer` with an underscore, such as `{{number_transfer}}`, stay ordinary dynamic variables. Test calls don't ask you for `-transfer` values.
* A value with no curly braces is read as an instruction for the agent, which must write the header's content itself when it transfers. For example: "The department the caller asked for, in one word".
* A variable the call doesn't have resolves to empty, and a header whose value ends up empty is not sent.
{% hint style="warning" %}
If a header of yours uses `{{call_summary_transfer}}` (with an underscore before `transfer`), rename it to `{{call_summary-transfer}}` (with a hyphen). The old name is no longer filled in, so the summary would arrive empty.
{% endhint %}
#### Encoded values: `|hex`, `|uui` and `|decode`
Many carriers and PBXs pass call context in the `User-to-User` header and expect its payload encoded. Add a filter after the variable name to encode or decode a value:
* `{{customer_id|hex}}` sends the value as hexadecimal ISDN User-to-User octets: accents are folded to plain letters, other non-ASCII characters are dropped, the value is cut at 127 characters and preceded by the `00` protocol discriminator.
* `{{customer_id|uui}}` sends the same octets followed by `;purpose=isdn-uui;content=isdn-uui;encoding=hex`, the complete User-to-User header value.
* `{{sip_header_user-to-user|decode}}` does the opposite: it turns a hexadecimal or Base64 value back into plain text, following the `encoding=` the value declares (a bare hexadecimal value is decoded as hex), and drops the leading protocol discriminator of an ISDN User-to-User payload. It also removes any `;parameter` suffix. Use `|decode` only on values you know are encoded: a plain value made of an even number of hex characters, such as `1234`, is decoded as hex too.
To encode a value built from several parts, wrap the whole value in `uui( )` or `hex( )`. This example decodes the payload the call arrived with, appends the summary the agent writes when it transfers, and sends the result encoded again:
```
User-to-User: uui({{sip_header_user-to-user|decode}}|{{call_summary-transfer}})
```
#### Headers received on inbound calls
When a call reaches your agent through a SIP trunk, the custom headers it carries become variables of the call, so you can use them in the prompt or pass them on in a transfer:
* `{{sip_header_}}` holds the value as it arrived. The name is the header name in lowercase: an `X-Customer-Data` header becomes `{{sip_header_x-customer-data}}`. Hyphens in these names are fine; the variable resolves as written.
* If the header is `User-to-User`, or its value declares `encoding=hex` or `encoding=base64`, Dapta also creates `{{sip_header__decoded}}` with the readable text. A header that doesn't declare its encoding gets no `_decoded` variable, even if its value looks like hex.
* When the decoded text has the form `id|name`, the two parts are also available as `{{sip_header__id}}` and `{{sip_header__name}}`.
For example, a call arriving with `X-Customer-Data: 4a55414e7c564950;encoding=hex` gives your agent `{{sip_header_x-customer-data_decoded}}` = `JUAN|VIP`, `{{sip_header_x-customer-data_id}}` = `JUAN` and `{{sip_header_x-customer-data_name}}` = `VIP`. Standard SIP headers such as `From`, `To`, `Via`, `Call-ID`, `Contact` or `User-Agent` are not exposed as variables.
{% hint style="info" %}
Inbound headers are read on calls that arrive over a SIP trunk, so they need a carrier or PBX that adds them. On outbound calls Dapta does not read headers from the carrier; there, `|decode` applies to encoded values you pass in the call's dynamic variables when you create the call. Web calls have no SIP transfer, so custom headers do not apply to them. Whether a header reaches the transfer destination depends on your carrier or PBX passing it through: confirm it with your telephony admin.
{% endhint %}
---
# Agent Instructions
This documentation is published with GitBook. GitBook is the documentation platform designed so that both humans and AI agents can read, navigate, and reason over technical content effectively. Learn more at gitbook.com.
## Querying This Documentation
If you need additional information that is not directly available in this page, you can query the documentation by asking a question.
Perform an HTTP GET request on the following URL with the `ask` and `goal` query parameters:
```
GET https://docs.dapta.ai/ai-voice-agents/agent-actions/transfer-call.md?ask=&goal=
```
`ask` is the immediate question: it should be specific, self-contained, and written in natural language.
`goal` is what the user is ultimately trying to achieve, the reason they need the answer. Sharing it helps GitBook give you a better, more relevant answer. A goal is most helpful when it describes the outcome the user wants rather than restating the question. For example, with `ask=how do I create an API token`, a goal like `automate deployments from our CI pipeline` lets GitBook tailor the answer to that use case.
The response will contain a direct answer to the question and relevant excerpts and sources from the documentation.
Use this mechanism when the answer is not explicitly present in the current page, you need clarification or additional context, or you want to retrieve related documentation sections.