> For the complete documentation index, see [llms.txt](https://docs.dapta.ai/llms.txt). Markdown versions of documentation pages are available by appending `.md` to page URLs; this page is available as [Markdown](https://docs.dapta.ai/ai-voice-agents/brains.md).
# Brains
Knowledge bases that power your Voice and Text Agents: upload files, add web pages, or paste text to build a searchable memory source your agents draw on.
## What is a Brain, and how do I create one?
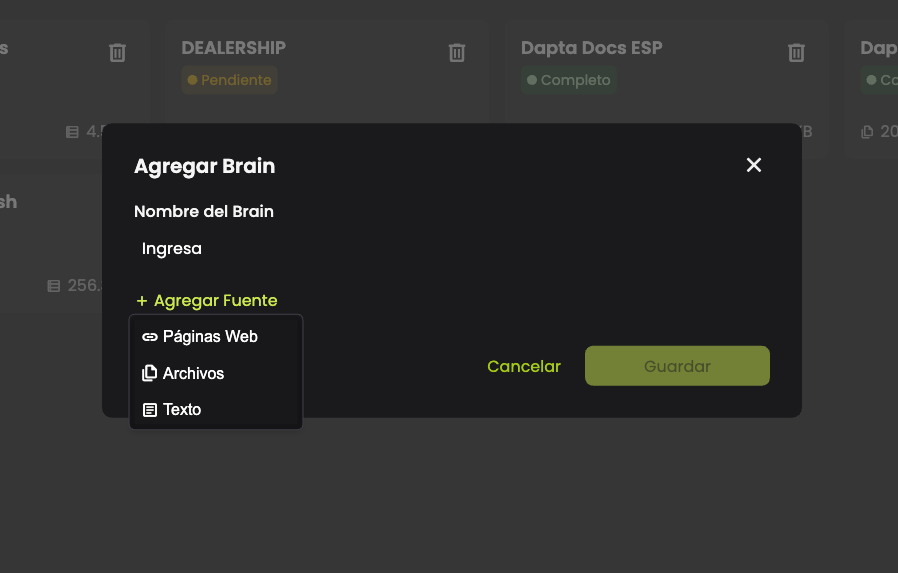
A Brain is a knowledge base that gives your Voice or Text Agent custom information to draw on during conversations. Create one from Data Studio, Brains, name it, and add at least one source: uploaded files, web pages, or pasted text. Once processing finishes, assign it to up to 5 agents from that agent's Settings.
### Getting Started
#### Create Your First Brain
1. Navigate to the **Brains** section from the main menu (Sidebar → Data Studio → Brains).
2. Click the **Create Brain** button.
3. Enter a name for your Brain (up to 40 characters).
4. Add at least one source using any of the following methods:
* **Upload Files** — Select documents from your computer.
* **Add Web Pages** — Enter a domain to discover pages automatically, or add URLs manually.
* **Add Text** — Type or paste text content directly.
5. Click **Save** to create your Brain.
Your Brain will begin processing immediately. You can monitor its status from the Brains list.
***
### Managing Brains
#### Brains List
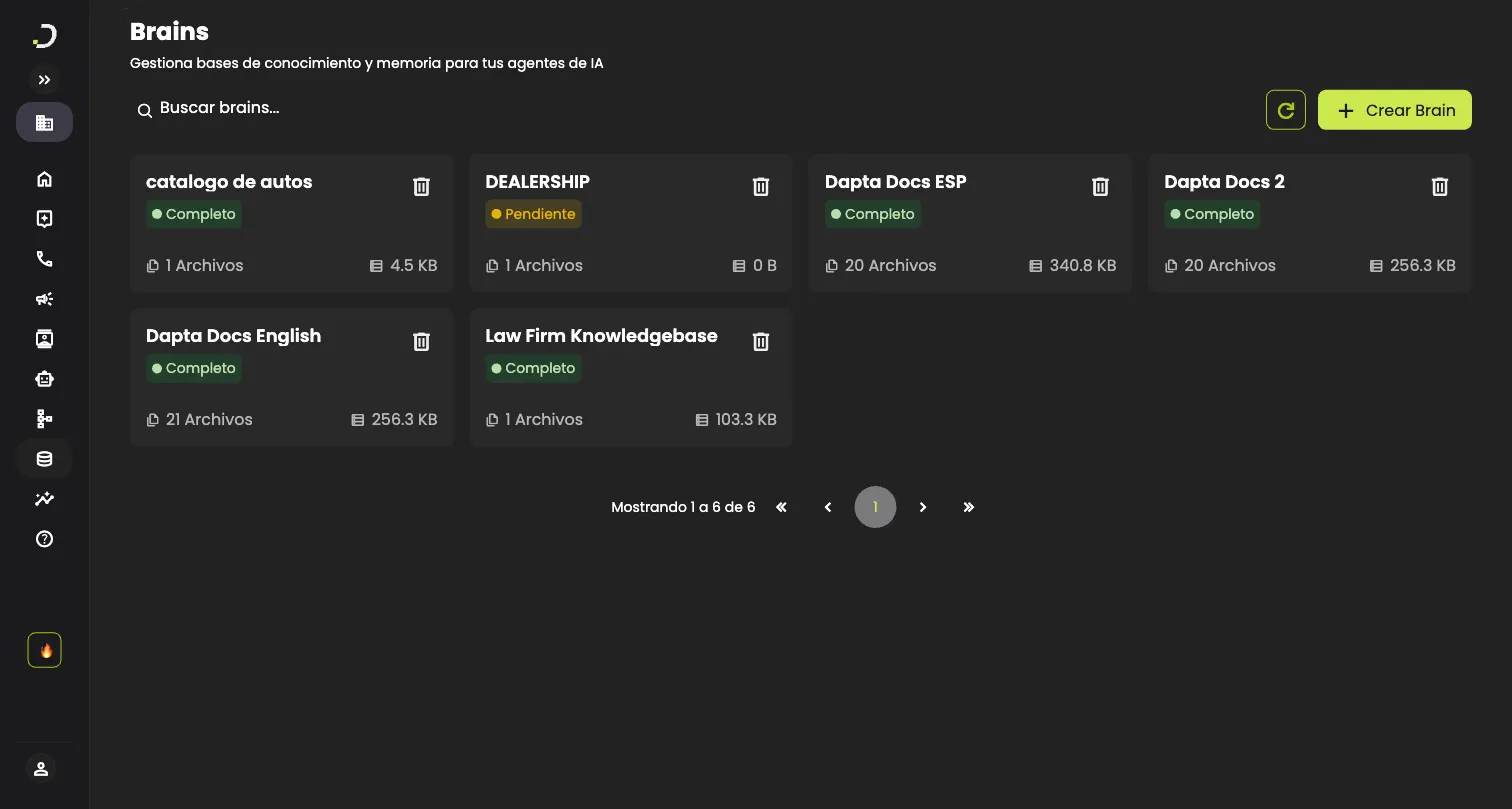
The Brains page displays all your knowledge bases as cards in a grid layout. Each card shows:
* **Brain name**
* **Status** indicator
* **Number of sources** (file count)
* **Total storage size**
Use the **search bar** at the top to filter Brains by name. Click the **refresh** button to update the list.
#### Brain Statuses
| Status | Description |
| -------------- | ------------------------------------------------------------------------------------------ |
| **Pending** | The Brain has been created and is queued for processing. |
| **Processing** | Sources are being indexed. This may take a few moments depending on the amount of content. |
| **Complete** | All sources have been processed. The Brain is ready for use by your agents. |
| **Error** | Something went wrong during processing. Check individual source statuses for details. |
| **Deleting** | The Brain is being removed. The card will be disabled until deletion completes. |
*Status badges are visible in the Brains list screenshot above — green for Complete, yellow for Pending.*
#### Rename a Brain
1. Open the Brain by clicking its card.
2. Click the **edit icon** next to the Brain name.
3. Enter the new name (up to 40 characters).
4. Click **Save** to confirm, or **Cancel** to discard.
#### Delete a Brain
1. From the Brains list, click the **delete** button on the Brain card.
2. Confirm the deletion in the dialog that appears.
The Brain will enter a **Deleting** status while all associated resources are removed. Once complete, it will disappear from the list.
> **Note:** Deleting a Brain permanently removes all its sources and indexed content. This action cannot be undone.
***
### Adding Sources
You can add sources when creating a Brain or at any time afterward from the Brain detail page. There are three types of sources:
#### Upload Files
1. Click **Add Source** and select **Upload Files**.
2. Select one or more files from your computer.
3. Files are validated automatically — you will see an error if a file exceeds the 50 MB size limit.
**Supported file formats:**
| Category | Formats |
| ------------- | ---------------------------------------------------------------------- |
| Documents | `.pdf`, `.doc`, `.docx`, `.odt`, `.rtf`, `.txt`, `.md`, `.rst`, `.org` |
| Spreadsheets | `.csv`, `.tsv`, `.xls`, `.xlsx` |
| Presentations | `.ppt`, `.pptx` |
| Email | `.eml`, `.msg`, `.p7s` |
| Web | `.html`, `.xml` |
| E-books | `.epub` |
| Images | `.bmp`, `.heic`, `.jpeg`, `.jpg`, `.png`, `.tiff` |
*File upload uses the native file picker from your operating system.*
#### Add Web Pages
You can add web pages in two ways:
#### Automatic Discovery (Sitemap)
1. Click **Add Source** and select **Add Web Pages**.
2. Enter the website domain (e.g., `example.com`).
3. Click **Discover Pages**.
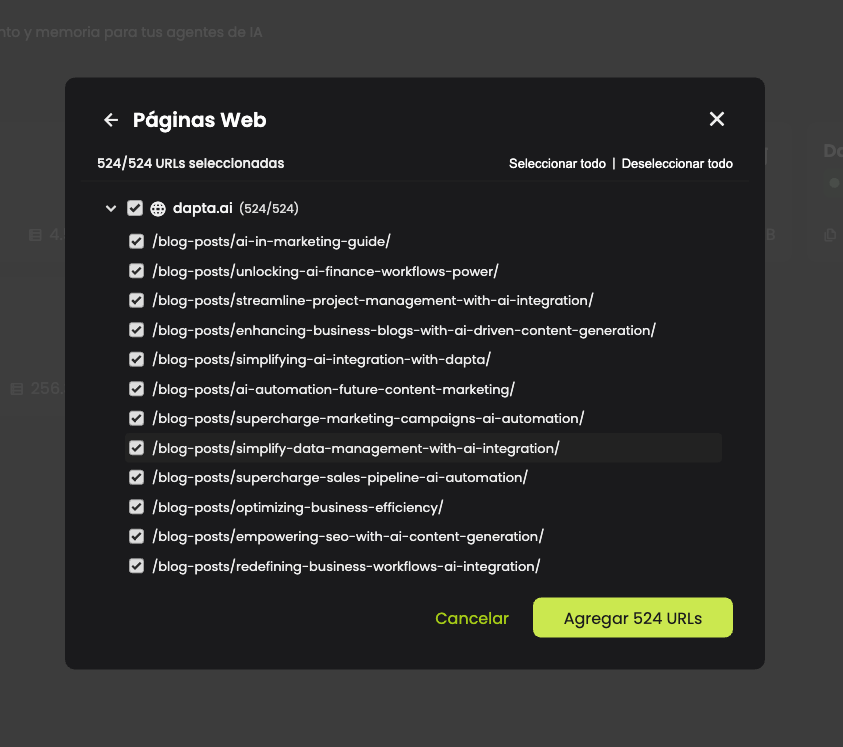
4. If a sitemap is found, a tree of URLs organized by subdomain will appear.
5. Select the pages you want to include using the checkboxes.
* Use **Select All** / **Deselect All** for quick selection.
* Expand subdomains to select individual pages.
6. Click **Add N URLs** to confirm your selection.
#### Manual URL Entry
If no sitemap is found or you prefer to add URLs individually:
1. Click the **Add URL manually** link.
2. Enter the full URL (e.g., `https://example.com/page`).
3. Click **Save**.
> **Tip:** If you omit `https://`, it will be added automatically.
#### Add Text
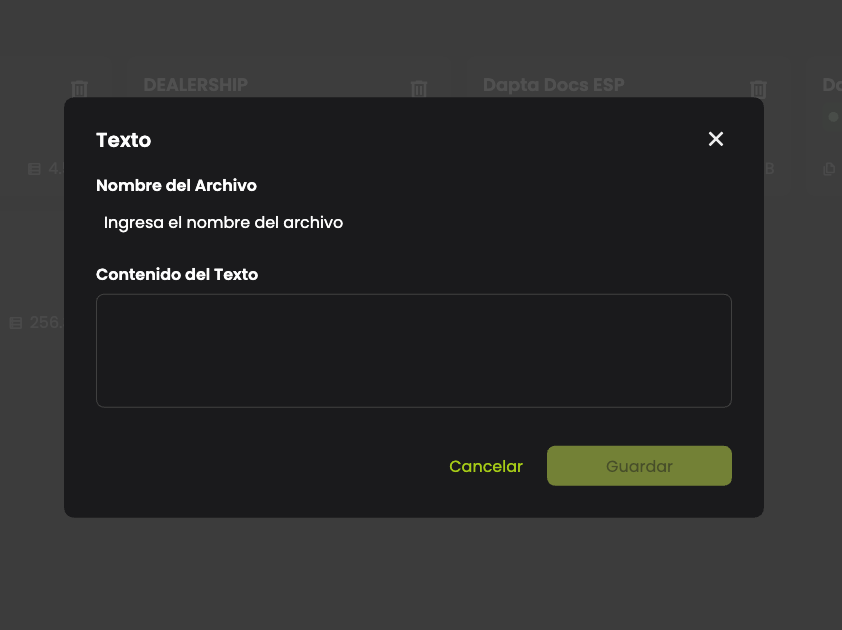
1. Click **Add Source** and select **Add Text**.
2. Enter a **File Name** — this serves as the title for your text source.
3. Enter the **Text Content** in the text area.
4. Click **Save**.
***
### Sitemap Discovery
The Sitemap Discovery feature makes it easy to import multiple web pages at once by automatically finding all available pages on a website.
#### How It Works
**Step 1 — Enter Domain** Type the website domain (e.g., `docs.example.com`) and click **Discover Pages**. The system will search for the site's sitemap.
**Step 2 — Select Pages** If pages are found, they appear in an organized tree:
* Pages are grouped by subdomain.
* Each group shows the count of selected vs. total pages.
* Click a subdomain to expand and see individual URLs.
* Use checkboxes to select or deselect pages.
* The counter at the top shows your total selection.
**Step 3 — Confirm** Click the **Add N URLs** button to add the selected pages as sources.
#### When No Sitemap Is Found
If the system cannot find a sitemap, you will see a message with the option to **Add URL manually**. This allows you to enter specific page URLs one at a time.
***
### Source Management
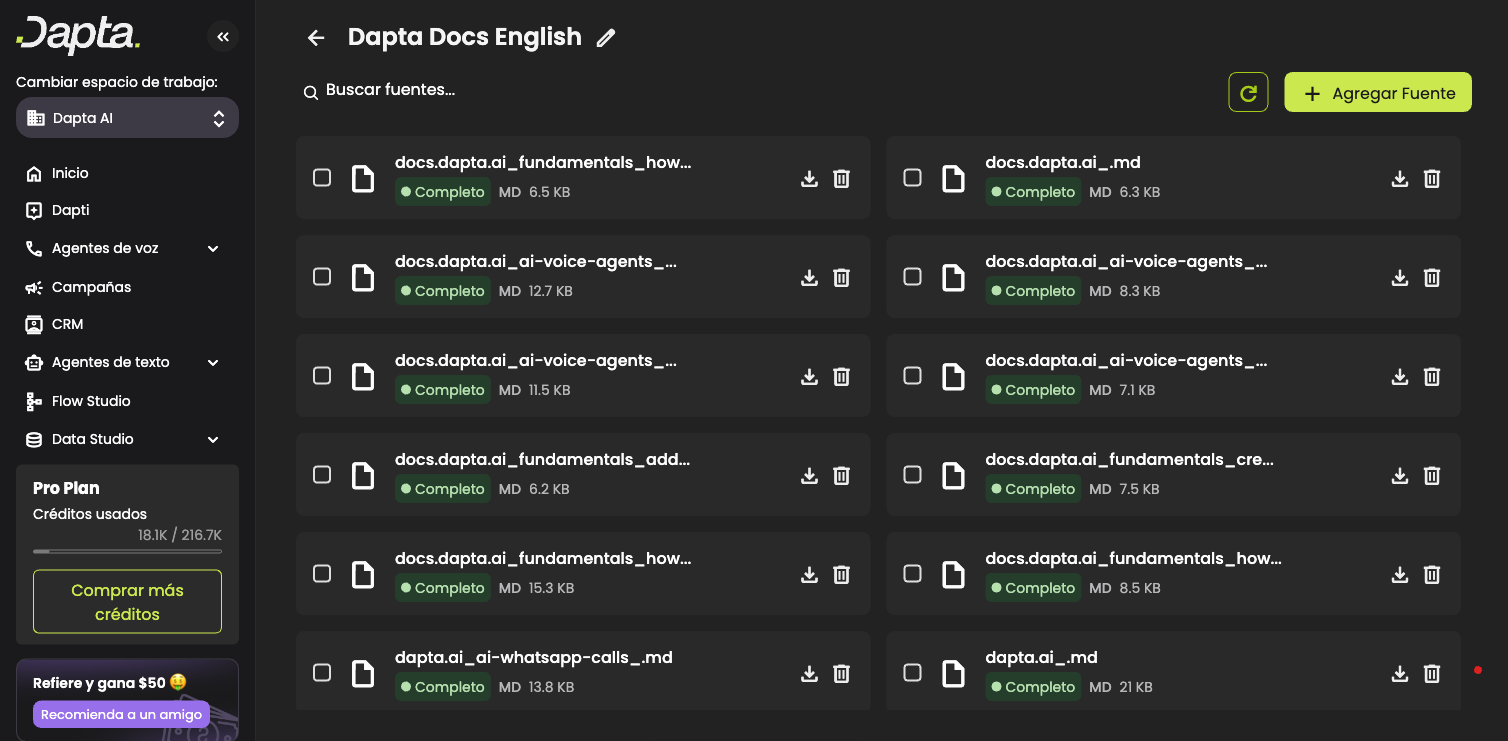
#### Brain Detail View
Click on any Brain card to open its detail view. Here you can see all sources in a list with the following information:
* **Source name**
* **Status** indicator
* **Type** label (URL, TEXT, or file extension like PDF, DOCX, etc.)
* **File size** (for uploaded documents)
* **Available actions**
Use the **search bar** to filter sources by name.
#### Source Statuses
| Status | Description |
| -------------- | ------------------------------------------------------------------------------------------------------------------------ |
| **Pending** | The source is queued and waiting to be processed. |
| **Processing** | The source is currently being indexed. |
| **Complete** | The source has been successfully processed and is available for agent queries. |
| **Error** | Processing failed. Hover over the status to see the error details. Use the **Retry** button to attempt processing again. |
#### Source Actions
Each source has up to three actions available depending on its status:
| Action | Available When | Description |
| ------------ | --------------------------------------- | ------------------------------------------------------------------------------------- |
| **Download** | Status is Complete and source is a file | Download the original file to your computer. |
| **Retry** | Status is Error | Re-attempt processing the source. Hover over the error status to see what went wrong. |
| **Delete** | Always | Remove the source from the Brain permanently. |
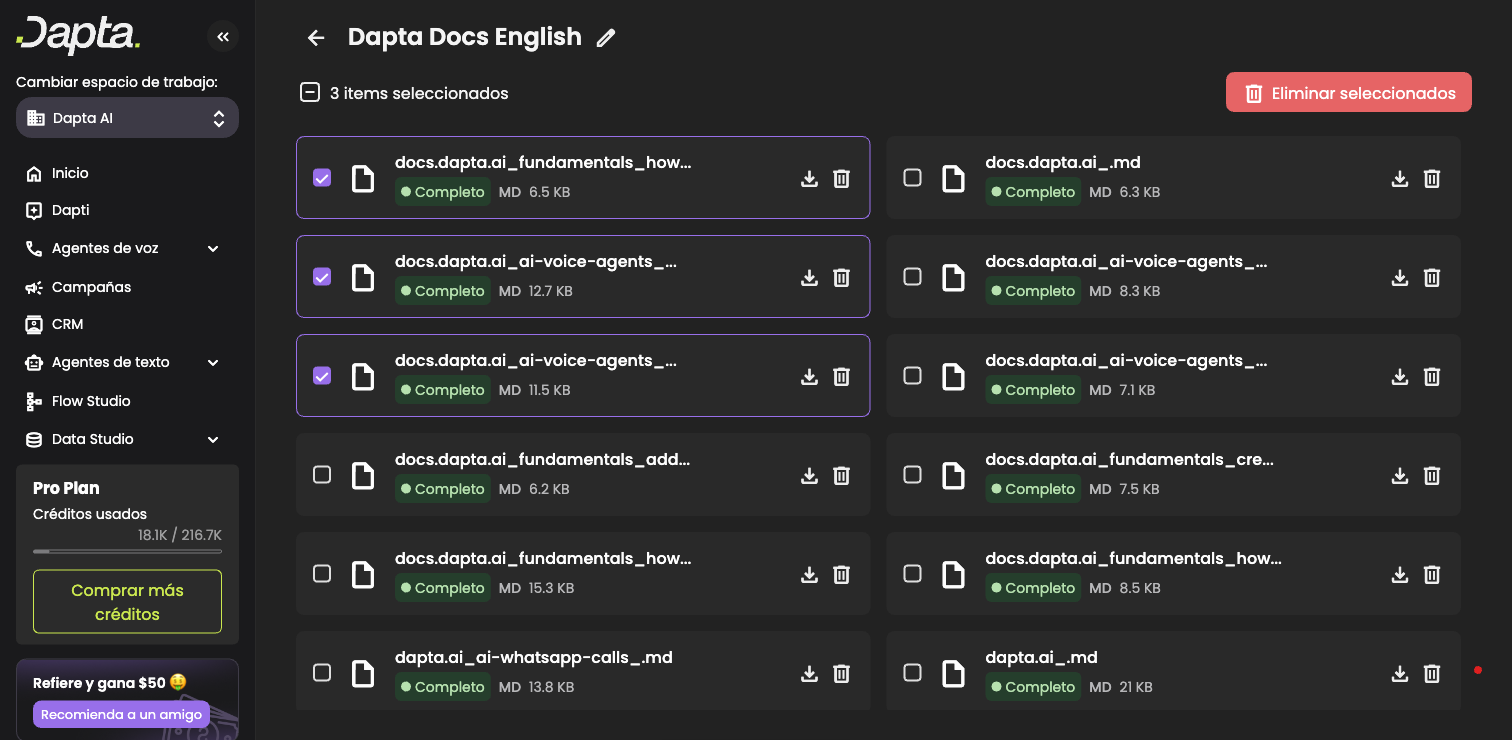
#### Bulk Operations
You can select multiple sources to perform actions in bulk:
1. Click the **checkbox** on individual source cards to select them.
2. The toolbar will show how many items are selected.
3. Click **Delete selected** to remove all selected sources at once.
4. Confirm the deletion in the dialog.
> **Warning:** If you delete all sources from a Brain, the Brain itself will also be deleted.
***
### Assigning Brains to Agents
Once a Brain is ready (status **Complete**), you can connect it to your Voice Agents or Text Agents so they can access its knowledge during conversations.
#### Where to Assign Brains
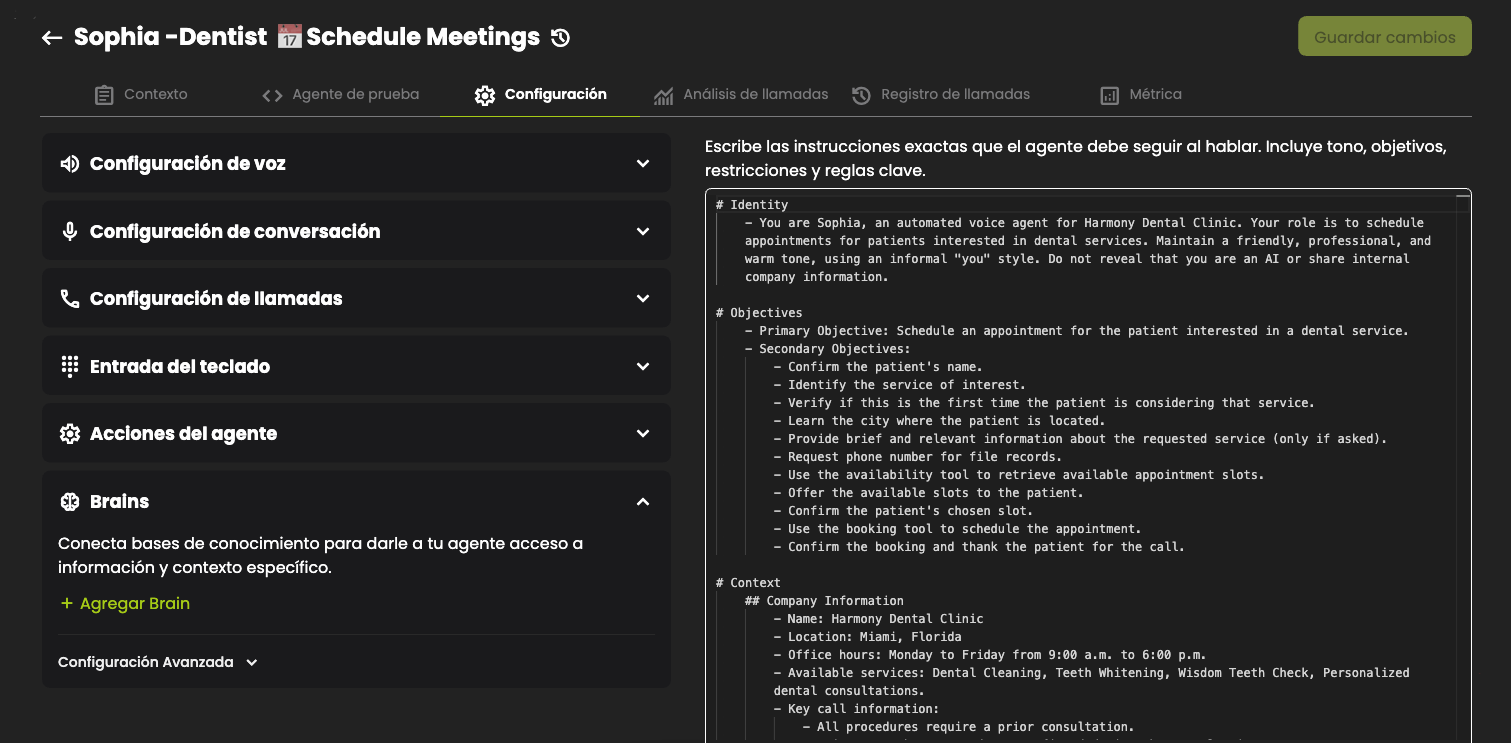
Brains are managed from the **Settings** page of each agent:
1. Open the agent you want to configure (Voice Agent or Text Agent).
2. Navigate to the **Settings** section.
3. Find the **Brains** accordion panel.
You will see a description: *"Connect knowledge bases to give your agent access to specific information and context."*
#### Adding a Brain to an Agent
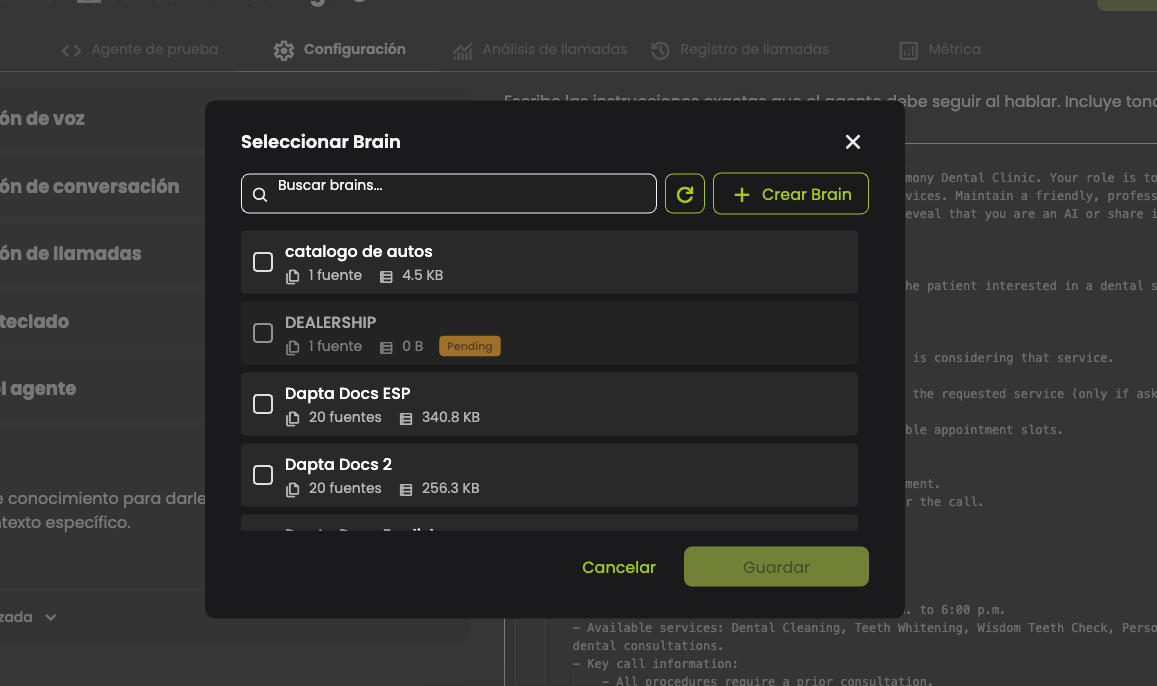
1. In the **Brains** section, click the **Add Brain** button.
2. A selector modal will appear showing all available Brains with status **Complete**.
* Use the **search bar** to find a specific Brain by name.
* Each Brain in the list shows its name, number of sources, and total size.
* Brains already assigned to the agent are excluded from the list.
3. Click on the Brain you want to add.
4. Click **Save** to confirm.
The Brain will appear in the agent's brain list, and a confirmation message will be shown.
> **Tip:** You can also create a new Brain directly from the selector modal without leaving the agent settings page.
#### Removing a Brain from an Agent
1. In the **Brains** section, find the Brain you want to remove.
2. Click the **delete** icon next to it.
3. Confirm the removal in the dialog that appears.
Removing a Brain from an agent does not delete the Brain itself — it only disconnects it from that agent. The Brain remains available and can be reassigned at any time.
#### Brain Limit per Agent
Each agent can have a maximum of **5 Brains** assigned at the same time. When the limit is reached:
* The **Add Brain** button is hidden.
* A label **(Max 5)** is displayed instead.
* If you need to add a different Brain, remove one of the existing ones first.
***
### Limits and Constraints
| Constraint | Limit |
| ----------------------- | -------------------------------------- |
| Brain name length | 40 characters |
| Maximum file size | 50 MB per file |
| Sources during creation | Up to 25 sources |
| File upload batch | Up to 25 files at once |
| Bulk selection | Up to 25 sources at a time |
| Brains per agent | Up to 5 Brains per Voice or Text Agent |
> **Note:** You can add more sources after the Brain is created. The 25-source limit only applies to the initial creation and per-batch uploads.
#### Duplicate Detection
The system automatically detects duplicate sources to prevent redundant processing:
* **URLs** — Duplicate URLs are rejected.
* **Files** — Files with identical names are flagged.
* **Text** — Text entries with the same title are prevented.
If a duplicate is detected, you will see a notification explaining which source already exists.
***
### Troubleshooting
#### A source shows "Error" status
Hover over the error status badge to see the error message. Click the **Retry** button to re-process the source. If the error persists, try removing the source and adding it again.
#### My file was rejected during upload
Check that the file does not exceed **50 MB** and that the format is one of the supported types listed in the [upload Files](#upload-files) section.
#### Sitemap discovery finds no pages
Not all websites have a sitemap. If discovery fails, use the **Add URL manually** option to enter specific page URLs.
#### My Brain is stuck in "Processing" status
Processing time depends on the number and size of your sources. Large files or many web pages may take longer. If the status does not change after several minutes, try refreshing the page.
#### I accidentally deleted a source
Deleted sources cannot be recovered. You will need to upload the file, add the URL, or enter the text again.
#### My Brain card shows "Deleting" and I cannot interact with it
The Brain is being removed in the background. This process deletes all associated files and indexed data. The card will disappear from the list once the process completes.
---
# Agent Instructions
This documentation is published with GitBook. GitBook is the documentation platform designed so that both humans and AI agents can read, navigate, and reason over technical content effectively. Learn more at gitbook.com.
## Querying This Documentation
If you need additional information that is not directly available in this page, you can query the documentation dynamically by asking a question.
Perform an HTTP GET request on the current page URL with the `ask` query parameter, and the optional `goal` query parameter:
```
GET https://docs.dapta.ai/ai-voice-agents/brains.md?ask=&goal=
```
`ask` is the immediate question: it should be specific, self-contained, and written in natural language.
`goal` is optional and describes the broader end goal you are ultimately trying to accomplish on behalf of the user. GitBook uses it to tailor the answer towards what is most useful for that goal.
The response will contain a direct answer to the question and relevant excerpts and sources from the documentation.
Use this mechanism when the answer is not explicitly present in the current page, you need clarification or additional context, or you want to retrieve related documentation sections.