> For the complete documentation index, see [llms.txt](https://docs.dapta.ai/llms.txt). Markdown versions of documentation pages are available by appending `.md` to page URLs; this page is available as [Markdown](https://docs.dapta.ai/ai-voice-agents/how-to-set-up-your-ai-voice-agent/post-call-analysis-notifications.md).
# Post Call Analysis – Notifications 🔔
Email an alert after a call when a post-call condition is met, or get a daily email report of a voice agent's call performance.
The **Notifications** feature lets your agent send an automated email after a call is executed. You decide who receives it, which post-call data the email contains, and the condition that must be met for the email to be sent.
Emails are sent from `notifications@daptatech.com`.
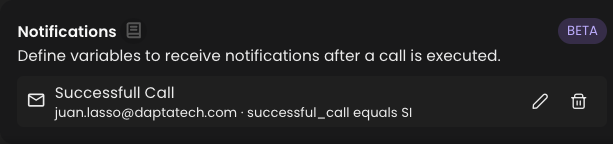
You'll find it in the **Post-Call Analysis** section of your agent, selectable from the **Call Analysis** tab within the voice agents, below **Call Analysis Flow**.
If no notification has been configured yet, the card shows an **Add Notification** button. Once configured, the card displays the recipient and trigger condition, and it can be edited or deleted.
***
## Setting Up a Notification
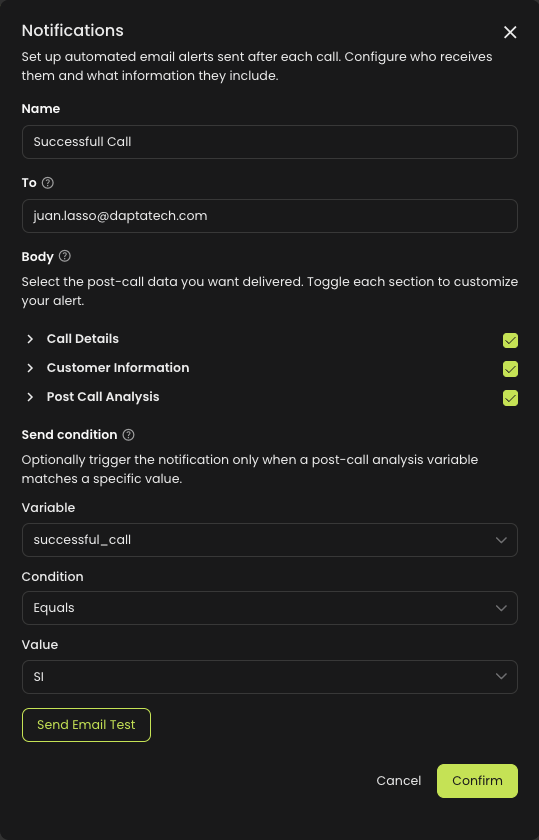
Click **Add Notification** to open the configuration modal.
### Name
A label to identify this notification internally (e.g. *Sales follow-up alert*). Required.
### To
The email address that will receive the notification. Required, and must be a valid email.
### Body
Choose which post-call data the email includes. Each section is a toggle and all are enabled by default:
* **Call Details** – basic call metadata such as numbers, duration and timestamps.
* **Customer Information** – the customer details associated with the call.
* **Post Call Analysis** – the custom variables extracted during post-call analysis.
Turn off any section you don't want to receive.
### Send Condition
The send condition is **required**. The email is delivered only when the chosen post-call analysis variable matches a specific value.
* **Variable** – pick one of the variables you defined in **Data Retrieval from your Calls**.
* **Condition** – `Equals` or `Does not equal`.
* **Value** – the value to compare against. The input adapts to the variable type:
* **Boolean** → choose *Yes* or *No*.
* **Selector (enum)** → choose from the variable's predefined options.
* **Text / Number** → type the expected value.
{% hint style="info" %}
The send condition depends on a post-call variable. If no post-call variable has been created and the condition is not set, the notification can't be sent. Define your variables first under **Data Retrieval from your Calls**. See [Post Call Analysis – Post-Call Data Retrieval](/ai-voice-agents/how-to-set-up-your-ai-voice-agent/post-call-analysis-post-call-data-retrieval.md).
{% endhint %}
We recommend creating a new post-call variable specifically as the trigger for the notification (for example a `successful_call` boolean, or a `should_notify` selector), so the condition stays meaningful and isolated from variables used elsewhere.
Example: send the email only when `successful_call` **equals** `Yes`.
### Send Email Test
Use **Send Email Test** to send a sample email to the configured recipient with the currently enabled sections, so you can preview the format before saving.
### Saving
Click **Confirm** to save. All three send condition fields (variable, condition, value) must be completed before saving. Use **Cancel** to close without saving.
***
## Editing or Deleting
From the Notifications card, use the **pencil** icon to reopen the modal and adjust any setting, or the **trash** icon to remove the notification (a confirmation is required). Only one notification can be configured per agent.
***
## Scheduled email report
The **Scheduled email report** sends a daily summary of this agent's call performance by email, so you can follow results without opening Dapta. Its card sits right below **Notifications**, and it is off until you turn it on.
**To set it up:**
1. Turn on **Scheduled email report**.
2. Choose the **Time to send** (in 15-minute steps) and the **Time zone**.
3. Choose the **Report day**:
* **Same day** — the calls of the day the email is sent, up to the time it goes out.
* **Previous day** — all the calls of the day before.
4. In **Send to**, type an email address and press **Enter**. Add as many recipients as you need; at least one is required.
5. Save the agent's settings to keep the configuration.
Use **Send Test Email** to preview the format. The test email is filled with sample data, not your agent's real calls.
### What the report includes
* Credits used, number of calls, unique contacts, connection rate and success rate.
* Cost per result — or cost per contact when no call reached its objective.
* A contact funnel.
* A few AI-written insights about the day's conversations, when the calls have summaries.
The report covers this agent's inbound and outbound phone calls; web calls and test calls are not included. On a day without calls, no email is sent. The email is written in Spanish when the agent's language is Spanish, and in English otherwise. For what each figure means, see [Voice Agent Metrics](/ai-voice-agents/voice-agent-metrics.md).
{% hint style="info" %}
The email arrives within about half an hour after the time you choose, not at the exact minute.
{% endhint %}
---
# Agent Instructions
This documentation is published with GitBook. GitBook is the documentation platform designed so that both humans and AI agents can read, navigate, and reason over technical content effectively. Learn more at gitbook.com.
## Querying This Documentation
If you need additional information that is not directly available in this page, you can query the documentation dynamically by asking a question.
Perform an HTTP GET request on the current page URL with the `ask` query parameter, and the optional `goal` query parameter:
```
GET https://docs.dapta.ai/ai-voice-agents/how-to-set-up-your-ai-voice-agent/post-call-analysis-notifications.md?ask=&goal=
```
`ask` is the immediate question: it should be specific, self-contained, and written in natural language.
`goal` is optional and describes the broader end goal you are ultimately trying to accomplish on behalf of the user. GitBook uses it to tailor the answer towards what is most useful for that goal.
The response will contain a direct answer to the question and relevant excerpts and sources from the documentation.
Use this mechanism when the answer is not explicitly present in the current page, you need clarification or additional context, or you want to retrieve related documentation sections.