> For the complete documentation index, see [llms.txt](https://docs.dapta.ai/llms.txt). Markdown versions of documentation pages are available by appending `.md` to page URLs; this page is available as [Markdown](https://docs.dapta.ai/dapta-forms/logic/ending-screen.md).
# Ending screen
Set what every respondent sees after they submit a Dapta Form: the thank-you heading and message (with \[field] tokens), an optional redirect URL, how long to show the thank-you before redirecting, and
The ending is the thank-you screen a respondent sees after they submit. You set it once for the whole form in the **Design** panel, under **When the form ends**. If you also use [Outcomes](/dapta-forms/logic/outcomes.md), the ending becomes the default that every score range falls back to.
***
## Step 1: Open When the form ends
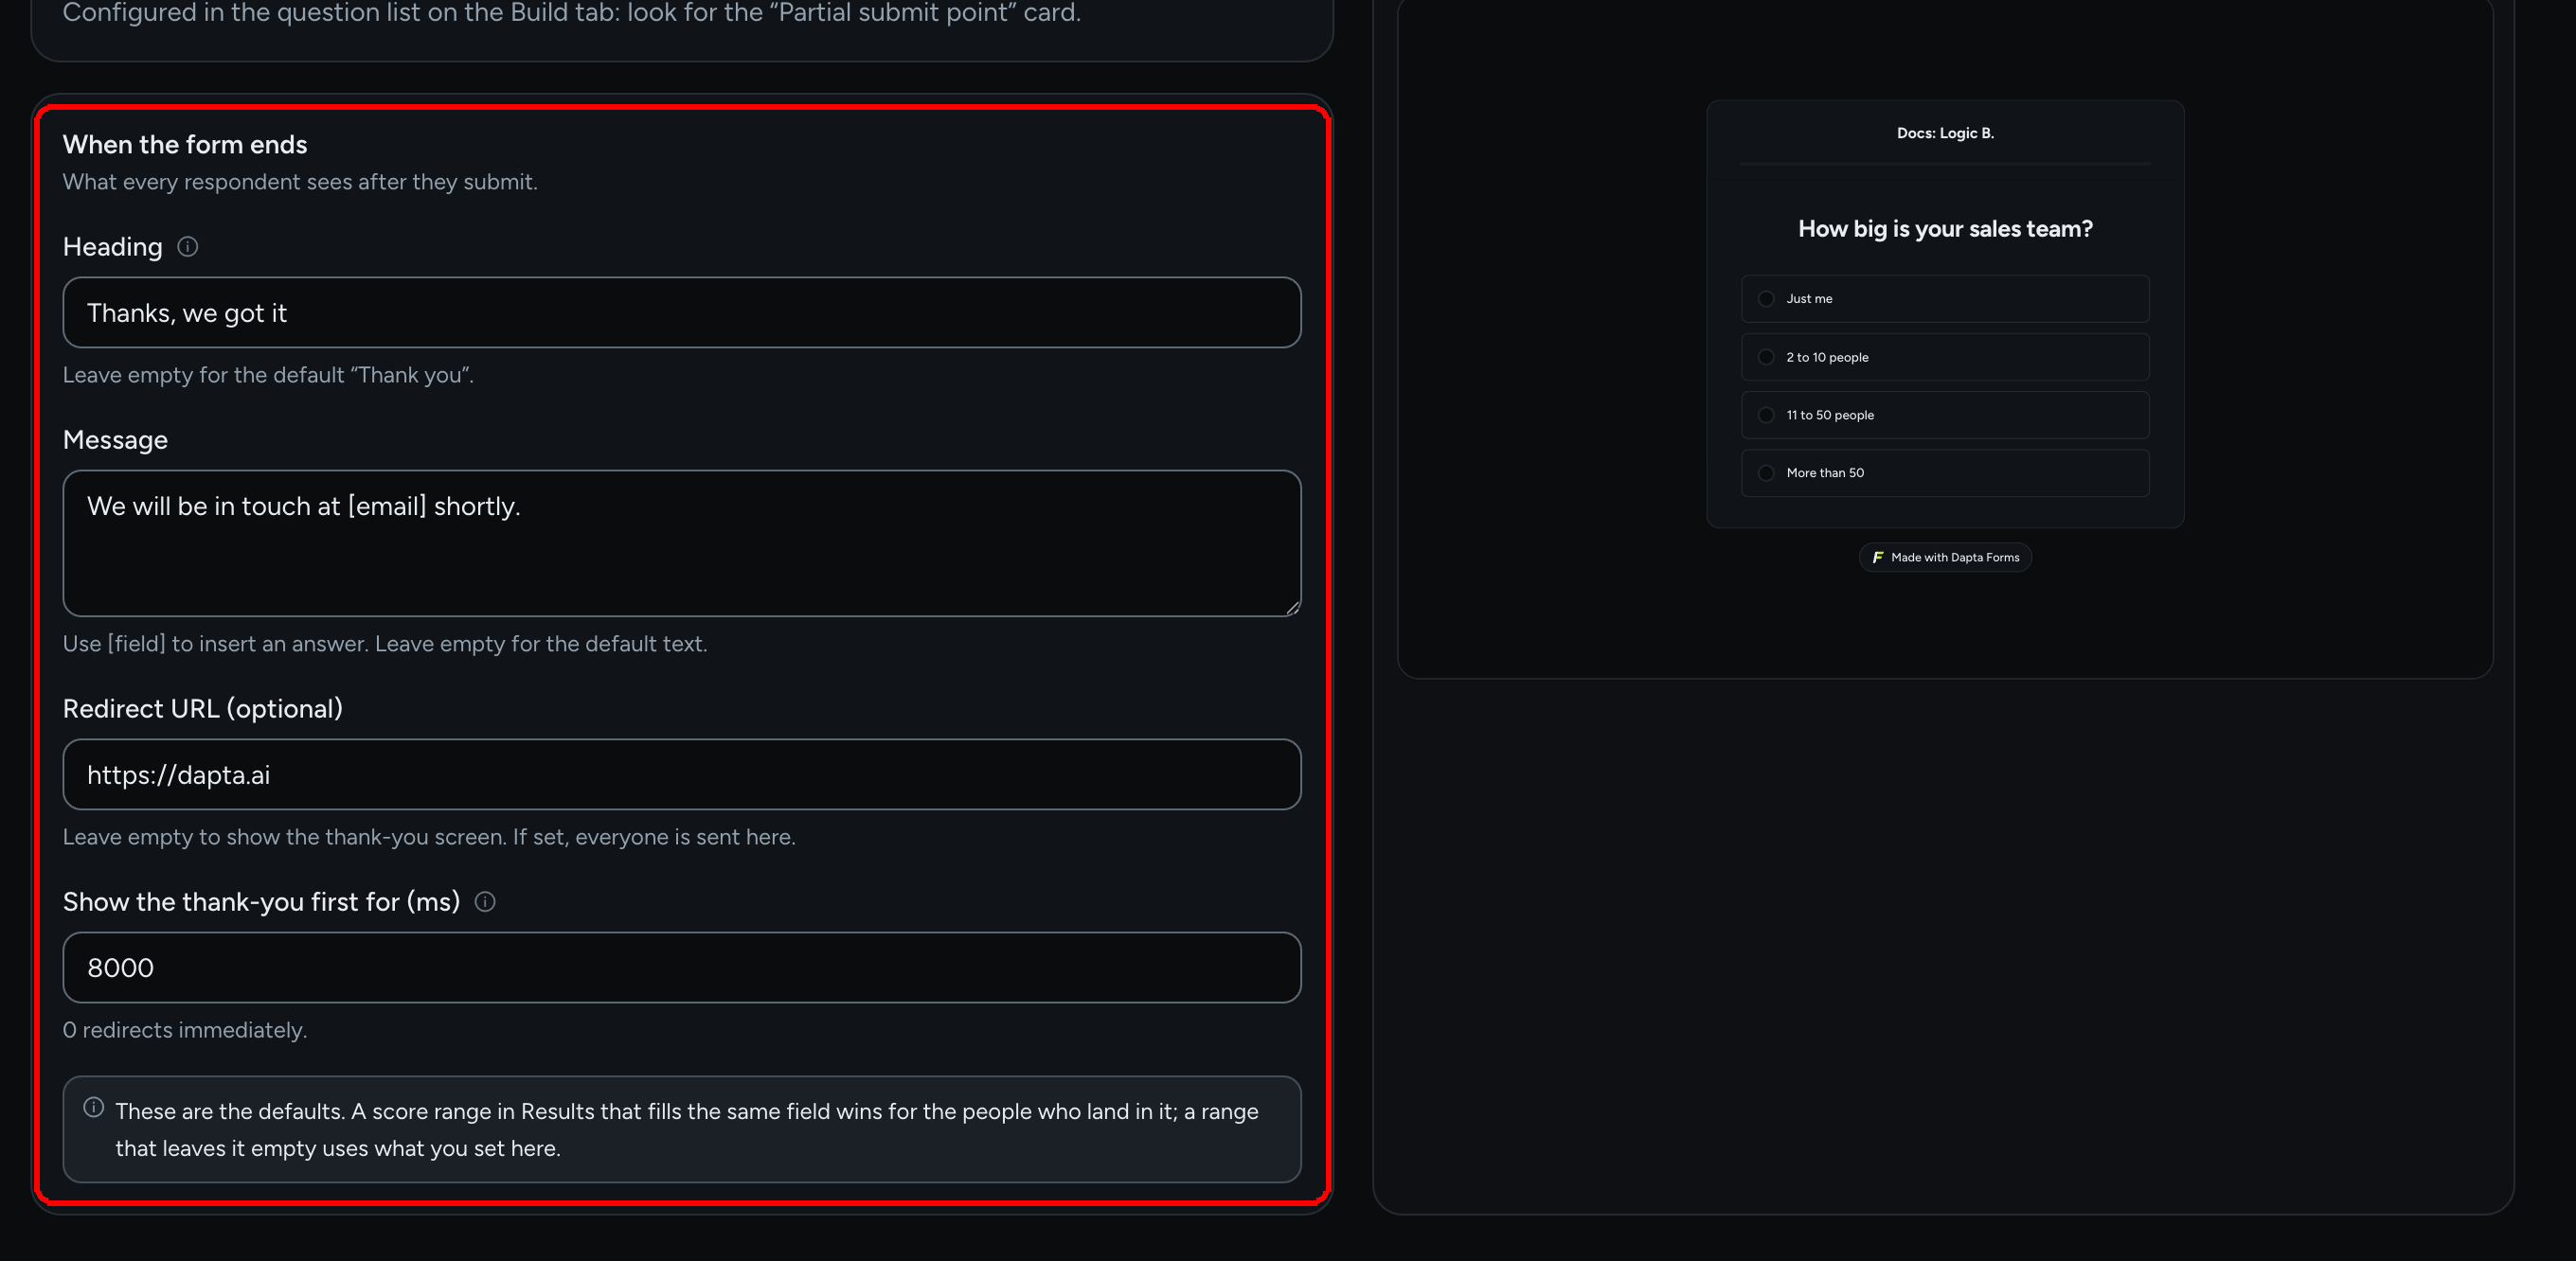
**Step 1:** In the editor, open the **Build** tab and click **Design** in the toolbar. Scroll to the bottom of the left column to the **When the form ends** panel. Its subtitle reads **What every respondent sees after they submit.**
**Step 2:** Fill in the fields you need. The right column previews the form live; use **Next screen** to walk to the end.
When the form ends: the default heading, message and redirect for everyone.
| Field | What it does |
| ------------------------------------- | -------------------------------------------------------------------------------------------------------------------------------------------------------------------------------------------------------------------------- |
| **Heading** | The big line on the thank-you screen. Leave it empty for the default **Thank you!** |
| **Message** | The body text under the heading. Type `@` or `[` to insert an earlier answer as a `[field]` token, for example **We will be in touch at \[email] shortly.** Leave it empty for the default **Your answers were recorded.** |
| **Redirect URL (optional)** | If set, respondents are sent to this address instead of staying on the thank-you screen. **Leave empty to show the thank-you screen. If set, everyone is sent here.** Only `http(s)` links are accepted. |
| **Show the thank-you first for (ms)** | Appears once a redirect URL is set. How long the thank-you screen stays up before the redirect happens. **0 redirects immediately.** Use something like `3000` to let people read the message first. |
Changes are saved automatically. **Publish** to make them live.
***
## Step 2: What the respondent sees
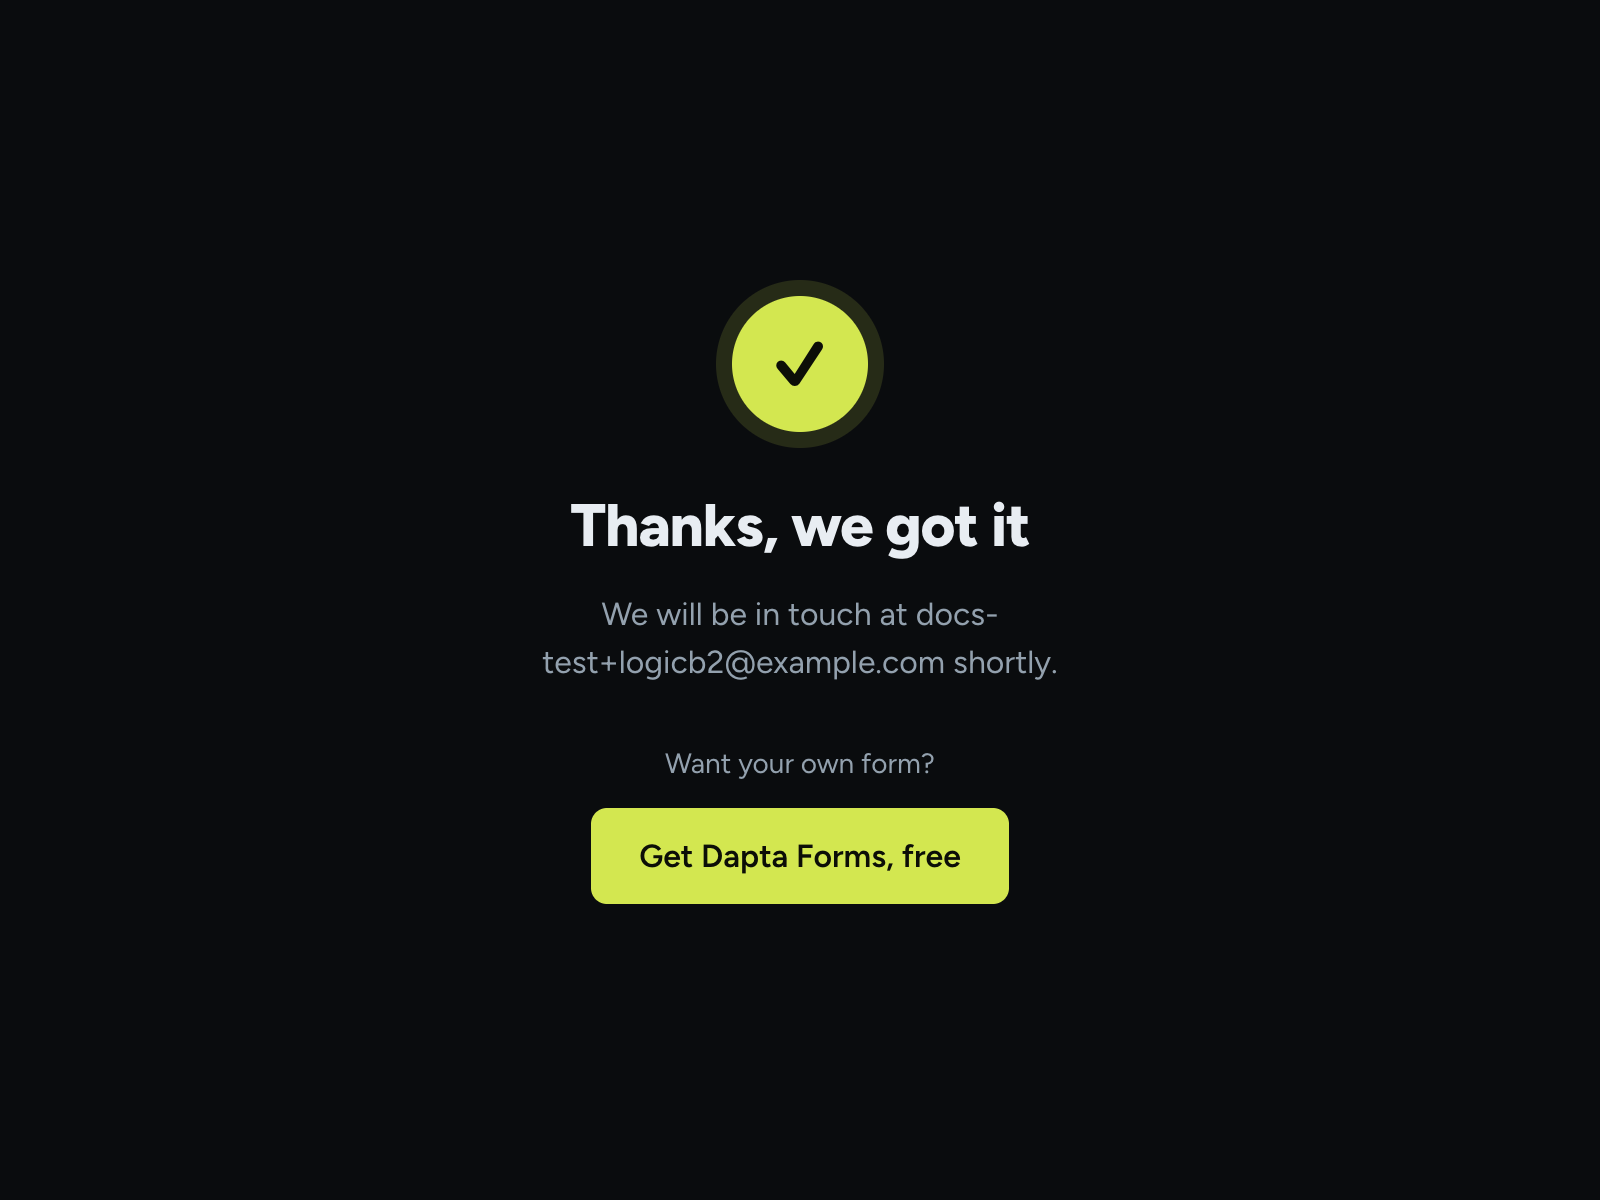
After the last question (or after a [Reveal screen](/dapta-forms/logic/reveal-screens.md) if you added one) the respondent lands on the thank-you screen: a check mark, your **Heading**, and your **Message** with every `[field]` replaced by their answer.
The default ending on the live form, with the [email] token filled in.
If a redirect is set, the screen is skipped (delay **0**) or shown for the delay you chose and then replaced by the destination page. Only `http(s)` links are followed: anything else is ignored and the thank-you screen is shown instead.
***
## How outcomes override the ending
The panel ends with a note: **These are the defaults. A score range in Results that fills the same field wins for the people who land in it; a range that leaves it empty uses what you set here.** In practice each field is resolved on its own:
| Field | Respondent in a score range | Respondent in no range (or scoring off) |
| ------------ | --------------------------------------------------------------------------------------------------------------------------------------------- | ----------------------------------------------------------- |
| Heading | The range's **Label** | The ending **Heading** (or **Thank you!**) |
| Message | The range's **Message shown for this outcome**; if empty, the ending **Message** | The ending **Message** (or **Your answers were recorded.**) |
| Redirect URL | The range's **Redirect URL**; if empty, the ending **Redirect URL** | The ending **Redirect URL** |
| Delay | The range's **Show the thank-you first (ms)** when the range has its own URL; the ending delay only when the URL is inherited from the ending | The ending **Show the thank-you first for (ms)** |
This gives you every common setup without a mode switch:
* **One thank-you for everyone**: fill only the ending.
* **A different thank-you per score**: fill the message on each range; leave the ending as the safety net.
* **Redirect everyone**: set the ending **Redirect URL** and leave the ranges' URLs empty.
* **Thank-you, then redirect**: ending **Redirect URL** plus a delay.
* **One special case**: set a URL or message on just that range.
> **⚠️ Note:** A range's **Label** always replaces the ending **Heading** for the people who land in it, because the label is the heading of that result. Give every range a label a respondent should read.
***
## What's next
* Split the thank-you by score in [Outcomes](/dapta-forms/logic/outcomes.md).
* Add a processing pause before the result with [Reveal screens](/dapta-forms/logic/reveal-screens.md).
* Check the respondent-side defaults and languages in [Respondent experience](/dapta-forms/respondent-experience.md).
---
# Agent Instructions
This documentation is published with GitBook. GitBook is the documentation platform designed so that both humans and AI agents can read, navigate, and reason over technical content effectively. Learn more at gitbook.com.
## Querying This Documentation
If you need additional information that is not directly available in this page, you can query the documentation dynamically by asking a question.
Perform an HTTP GET request on the current page URL with the `ask` query parameter, and the optional `goal` query parameter:
```
GET https://docs.dapta.ai/dapta-forms/logic/ending-screen.md?ask=&goal=
```
`ask` is the immediate question: it should be specific, self-contained, and written in natural language.
`goal` is optional and describes the broader end goal you are ultimately trying to accomplish on behalf of the user. GitBook uses it to tailor the answer towards what is most useful for that goal.
The response will contain a direct answer to the question and relevant excerpts and sources from the documentation.
Use this mechanism when the answer is not explicitly present in the current page, you need clarification or additional context, or you want to retrieve related documentation sections.