> For the complete documentation index, see [llms.txt](https://docs.dapta.ai/llms.txt). Markdown versions of documentation pages are available by appending `.md` to page URLs; this page is available as [Markdown](https://docs.dapta.ai/dforms/connect/connections.md).

# Integrations (account level)

Connect your dForms workspace to HubSpot, Calendly, Google Sheets, Salesforce and HighLevel once from the Integrations page, check who is connected, disconnect safely, and review the account-wide inve

The **Integrations** page is where your workspace meets the outside tools. You connect **HubSpot**, **Calendly**, **Google Sheets**, **Salesforce** and **HighLevel** here one time, and from then on every form in the workspace can use them from its own **Connect** tab. The same page lists every webhook your forms send, so you can spot a failing endpoint without opening each form.

You do not have to start here: every card on a form's **Connect** tab can connect its provider in place, without leaving the form.

***

**Step 1:** Click **Integrations** in the left rail. The page lists one card per service, in this order:

<figure><img src="https://3835013762-files.gitbook.io/~/files/v0/b/gitbook-x-prod.appspot.com/o/spaces%2FCy5rSNtQmtqYCGzJlNEB%2Fuploads%2Fgit-blob-f63132c1a5fe004cbbf4f93b9c3c9999fa520dbc%2Fforms-connections-01-connections-page.png?alt=media" alt="The Integrations page with the HubSpot, dCal, Calendly, Google Sheets, Salesforce and HighLevel cards"><figcaption><p>Six cards, one per service. Below them, the webhooks inventory.</p></figcaption></figure>

| Card              | How it connects                                                                                                                                                                                                                    | Details                                                                                                        |
| ----------------- | ---------------------------------------------------------------------------------------------------------------------------------------------------------------------------------------------------------------------------------- | -------------------------------------------------------------------------------------------------------------- |
| **HubSpot**       | Paste a private app token.                                                                                                                                                                                                         | Step 2 below, and [HubSpot](https://docs.dapta.ai/dforms/connect/hubspot.md).                                  |
| **dCal**          | Nothing to connect: it is marked **Included** and uses your Dapta sign-in. Its **How it works** button shows the three steps to use it in a form. On an installation without dCal, the badge reads **Not available here** instead. | [Scheduler step & Calendly](https://docs.dapta.ai/dforms/connect/scheduler-and-calendly.md).                   |
| **Calendly**      | Paste a personal access token.                                                                                                                                                                                                     | Step 2 below, and [Scheduler step & Calendly](https://docs.dapta.ai/dforms/connect/scheduler-and-calendly.md). |
| **Google Sheets** | **Continue with Google**: sign in with Google and allow access.                                                                                                                                                                    | [Google Sheets](https://docs.dapta.ai/dforms/connect/google-sheets.md).                                        |
| **Salesforce**    | **Connect**, then three values from an External Client App in your org: **My Domain**, **Consumer Key** and **Consumer Secret**.                                                                                                   | [Salesforce](https://docs.dapta.ai/dforms/connect/salesforce.md).                                              |
| **HighLevel**     | Paste a Private Integration token and the sub-account's Location ID (or its address).                                                                                                                                              | [HighLevel](https://docs.dapta.ai/dforms/connect/highlevel.md).                                                |

***

**Step 2 (HubSpot and Calendly):** On a card that is **Not connected**, click **Connect**. A single field appears: **Paste your HubSpot token** (or **Paste your Calendly token**), with the help text "The token is validated, encrypted, and stored server-side. It is never shown again." Paste the token and click **Connect** (the button reads **Connecting…** while it checks). Click **Cancel** to back out.

Where the tokens come from:

| Provider     | What to paste                                                                                                                                                                                                                                         | What the card shows afterwards                                             |
| ------------ | ----------------------------------------------------------------------------------------------------------------------------------------------------------------------------------------------------------------------------------------------------- | -------------------------------------------------------------------------- |
| **HubSpot**  | A private app access token from your HubSpot portal (Settings → Integrations → Private apps). It needs contact read/write scopes; add the `forms` and `form-submissions-write` scopes if you plan to turn on **Record a form submission in HubSpot**. | **Connected as** the token's label, **ending in** its last four characters |
| **Calendly** | A personal access token from your Calendly account (Integrations → API & webhooks).                                                                                                                                                                   | **Connected as** the email of the Calendly user who owns the token         |

If the field is empty when you click **Connect**, you get "Paste a token first." If the provider rejects the token: "Could not connect. Check the token and try again." On success a toast says **HubSpot connected.** (or **Calendly connected.**) and the card flips to **Connected**. From that moment the forms pick from the new account's HubSpot properties or Calendly event types.

> **💡 Tip:** If your forms are embedded on your website, connect the same HubSpot portal whose tracking code runs on those pages. That is what lets a contact be linked to the visits they made before converting. See [Landing page & HubSpot attribution](https://docs.dapta.ai/dforms/connect/hubspot/attribution.md).

> **⚠️ Note:** Only an **Owner** or **Admin** of the workspace can connect or disconnect. A member sees "Only an owner or admin can connect or disconnect {provider}. Ask one to do it." instead of the button. Members can still map fields on their forms once a connection exists.

***

**Step 3:** Read the connected state. Each connected card shows a **Connected** badge, a **Connected as** line, the date it was connected, and a **Disconnect** button. HubSpot and Calendly add **ending in** and the last four characters of the token; Salesforce adds the last four characters of the Consumer Key, never the secret; HighLevel adds the Location ID and the last four characters of the token. **Connected as** names the token's label for HubSpot, the Calendly user's email, the Google account's email, or the Salesforce org's name. HighLevel reads **Connected to** the sub-account's name instead.

<figure><img src="https://3835013762-files.gitbook.io/~/files/v0/b/gitbook-x-prod.appspot.com/o/spaces%2FCy5rSNtQmtqYCGzJlNEB%2Fuploads%2Fgit-blob-cf248dd9a25d65f1fa17c113ffc6243c1c12a230%2Fforms-connections-02-hubspot-connected.png?alt=media" alt="The HubSpot card in the Connected state showing the Connected badge, the Connected as line and the Disconnect button"><figcaption><p>The token itself is never shown again; the last four characters help you recognise which one is in use.</p></figcaption></figure>

The connected **Calendly** card adds one line: *Forms can pick the event types this account owns or hosts. To use a team event, connect an account that is one of its hosts.* A team event, such as a round robin, appears in a form's event list only when the connected account is one of its hosts. A form can still use any event by pasting its link: see [Scheduler: dCal and Calendly](https://docs.dapta.ai/dforms/connect/scheduler-and-calendly.md).

The badge can also read:

| Badge                         | Meaning                                                                                                                         |
| ----------------------------- | ------------------------------------------------------------------------------------------------------------------------------- |
| **Connected**                 | Your account's own token is stored and working.                                                                                 |
| **Not connected**             | Nothing stored yet; click **Connect**.                                                                                          |
| **Provided by the server**    | This deployment supplies a shared token, so syncing already works. Connecting your own token replaces it for your account only. |
| **Connecting is unavailable** | The server is not configured to store credentials; ask whoever runs your installation.                                          |

A card can also show **Not available on this deployment**: "{provider} needs settings that only whoever runs this deployment can add. Once they are added, it can be used here." That card has no button, because connecting could only fail. Today this applies to **Google Sheets** on an installation without Google's sign-in settings (self-hosted or test setups); on such an installation the Google Sheets card is also hidden from the forms' **Connect** tab. A connection made before keeps its normal card, so you can still see it and disconnect it.

***

**Step 4 (optional):** To remove a connection, click **Disconnect** and confirm **Disconnect HubSpot for this account?** (or the provider you chose). The toast **HubSpot disconnected.** confirms it. Forms keep their field mappings, but nothing is sent to that provider until you connect again.

***

## Google Sheets, Salesforce and HighLevel

Each is covered step by step on its own page. In short:

* **Google Sheets** connects with **Continue with Google**. "Google will ask you to sign in. dForms can only reach the spreadsheets it creates for you and the ones you choose, never the rest of your Drive." The card then shows **Connected as** the Google account's email. See [Google Sheets](https://docs.dapta.ai/dforms/connect/google-sheets.md).
* **Salesforce** connects with **Connect** and three values from your org. See [Salesforce](https://docs.dapta.ai/dforms/connect/salesforce.md).
* **HighLevel** connects with a Private Integration token and the Location ID of one sub-account. The card can also say that HighLevel stopped accepting the token, with **Replace token** to fix it without losing any form's mappings. See [HighLevel](https://docs.dapta.ai/dforms/connect/highlevel.md).

<figure><img src="https://3835013762-files.gitbook.io/~/files/v0/b/gitbook-x-prod.appspot.com/o/spaces%2FCy5rSNtQmtqYCGzJlNEB%2Fuploads%2Fgit-blob-59107797b38c4949ac26b971c92801e1c7dd7e28%2Fforms-connections-05-google-sheets-card.png?alt=media" alt="The Google Sheets card on the Integrations page, Not connected, with the note about access and the Continue with Google button"><figcaption><p>dForms only reaches the spreadsheets it creates and the ones you pick.</p></figcaption></figure>

***

## Webhooks inventory

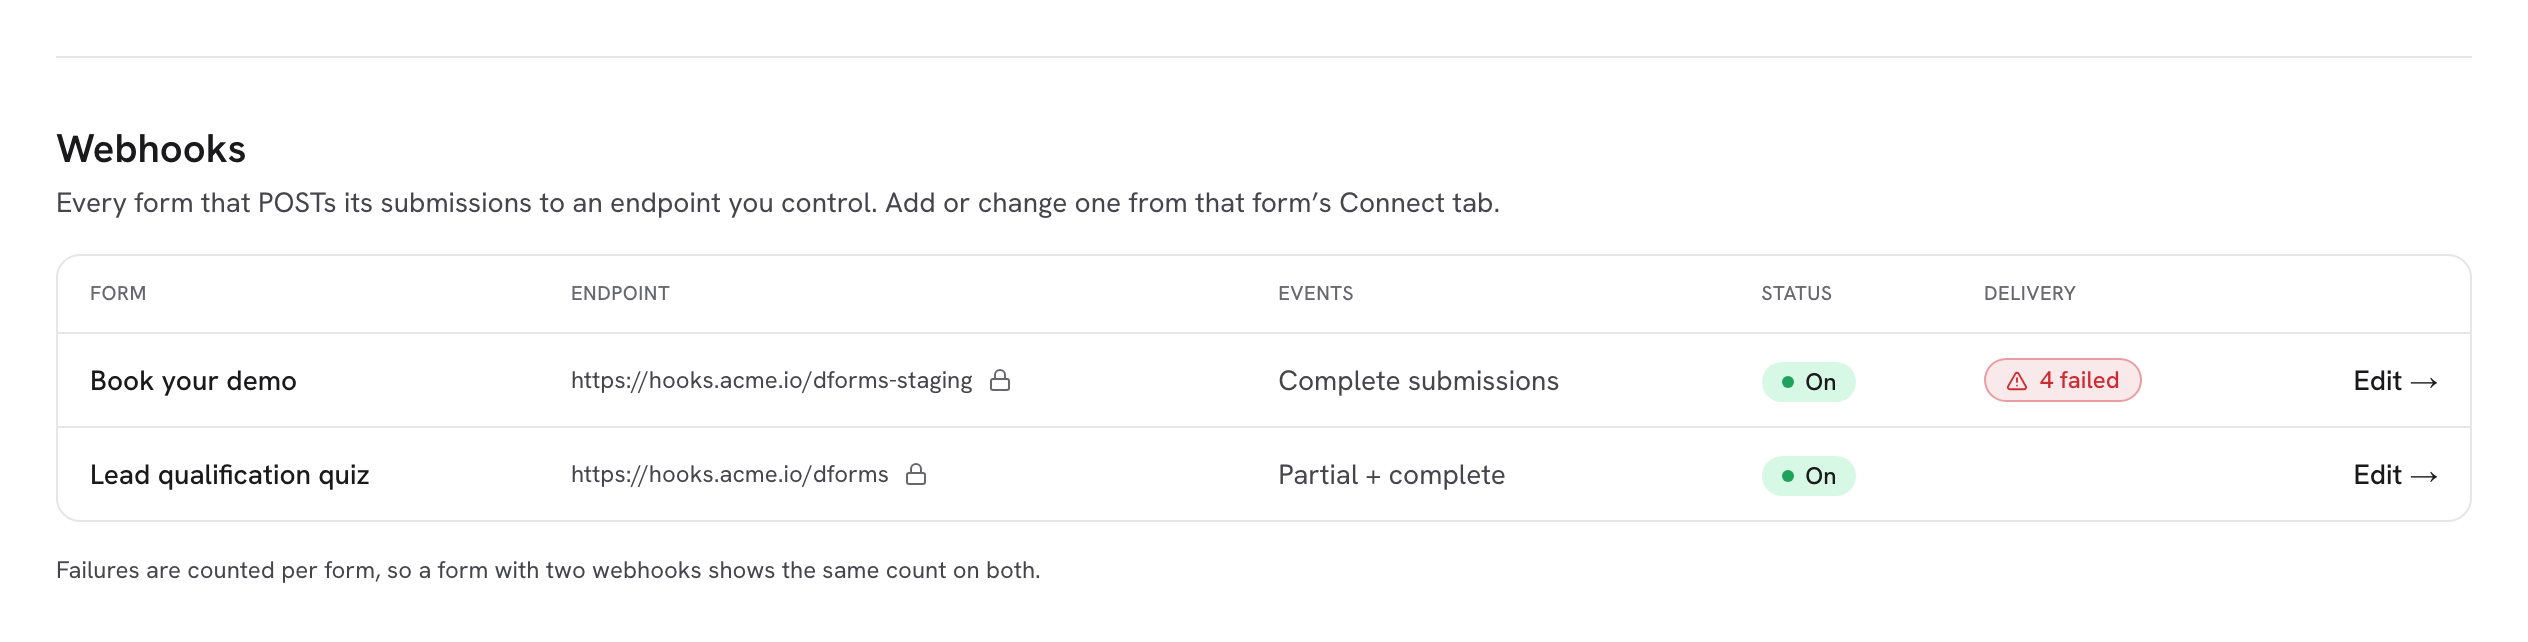
Below the cards, the **Webhooks** section lists "Every form that POSTs its submissions to an endpoint you control." You add or change a webhook from the form's Connect tab; this table is the account-wide overview.

<figure><img src="https://3835013762-files.gitbook.io/~/files/v0/b/gitbook-x-prod.appspot.com/o/spaces%2FCy5rSNtQmtqYCGzJlNEB%2Fuploads%2Fgit-blob-be26ec248a7f7b7214ce4d562fce86cb13353f0c%2Fforms-connections-04-webhooks-table.png?alt=media" alt="The Webhooks table with one row: form name, endpoint with a lock icon, events, status On, delivery column and an Edit link"><figcaption><p>One row per webhook. The lock icon means the webhook is <strong>Signed with a secret</strong>.</p></figcaption></figure>

| Column       | What it shows                                                                                                                                                                                                                                                                                                                           |
| ------------ | --------------------------------------------------------------------------------------------------------------------------------------------------------------------------------------------------------------------------------------------------------------------------------------------------------------------------------------- |
| **Form**     | The form's name, linked to its Connect tab.                                                                                                                                                                                                                                                                                             |
| **Endpoint** | The URL that receives the POST. A lock icon appears when a signing secret is set.                                                                                                                                                                                                                                                       |
| **Events**   | **Partial + complete**, **Partial submissions** or **Complete submissions**, matching the **Trigger on** boxes. When the published form has [spam protection](https://docs.dapta.ai/dforms/connect/spam-protection.md) on, partials are paused and the column reads **Complete (partials paused)** or **Partial submissions (paused)**. |
| **Status**   | **On** or **Off**: the card's **Enabled** switch.                                                                                                                                                                                                                                                                                       |
| **Delivery** | Empty when healthy. Shows a red **{n} failed** count and **Last failure {date}** when deliveries have exhausted their retries. Failures are counted per form, so a form with two webhooks shows the same count on both rows.                                                                                                            |
| **Edit →**   | Opens the form's Connect tab.                                                                                                                                                                                                                                                                                                           |

When no form has a webhook yet you see **No webhooks yet** with a **Go to forms** button.

> **💡 Tip:** Field mapping is configured per form, from each form's Connect tab. This page only manages the connections themselves and gives you the overview.

## What's next

* [HubSpot](https://docs.dapta.ai/dforms/connect/hubspot.md): map questions to contact properties once HubSpot is connected.
* [Google Sheets](https://docs.dapta.ai/dforms/connect/google-sheets.md): add each completed response to a spreadsheet as a new row.
* [Salesforce](https://docs.dapta.ai/dforms/connect/salesforce.md): send each response to your org as a Lead, or update the Contact or Lead it already has.
* [HighLevel](https://docs.dapta.ai/dforms/connect/highlevel.md): send each response to your HighLevel sub-account as a contact, with tags.
* [Scheduler: dCal and Calendly](https://docs.dapta.ai/dforms/connect/scheduler-and-calendly.md): add a booking step powered by dCal or your Calendly event types.
* [Webhooks](https://docs.dapta.ai/dforms/connect/webhooks.md): add a webhook to a form.
* [Members & roles](https://docs.dapta.ai/dforms/account/members-and-roles.md): who is an Owner, Admin or Member.


---

# Agent Instructions
This documentation is published with GitBook. GitBook is the documentation platform designed so that both humans and AI agents can read, navigate, and reason over technical content effectively. Learn more at gitbook.com.

## Querying This Documentation
If you need additional information that is not directly available in this page, you can query the documentation by asking a question.

Perform an HTTP GET request on the following URL with the `ask` and `goal` query parameters:

```
GET https://docs.dapta.ai/dforms/connect/connections.md?ask=<question>&goal=<user_goal>
```

`ask` is the immediate question: it should be specific, self-contained, and written in natural language.
`goal` is what the user is ultimately trying to achieve, the reason they need the answer. Sharing it helps GitBook give you a better, more relevant answer. A goal is most helpful when it describes the outcome the user wants rather than restating the question. For example, with `ask=how do I create an API token`, a goal like `automate deployments from our CI pipeline` lets GitBook tailor the answer to that use case.

The response will contain a direct answer to the question and relevant excerpts and sources from the documentation.

Use this mechanism when the answer is not explicitly present in the current page, you need clarification or additional context, or you want to retrieve related documentation sections.