> For the complete documentation index, see [llms.txt](https://docs.dapta.ai/llms.txt). Markdown versions of documentation pages are available by appending `.md` to page URLs; this page is available as [Markdown](https://docs.dapta.ai/dforms/share/public-page.md).

# Your workspace pages (link in bio)

Publish up to 20 pages for your workspace: your main page at app.dforms.ai/{account code} and more at app.dforms.ai/{account code}/p/{address}, one per event, channel or country. Each has its logo, a

A workspace page is one link that holds everything you want people to reach: your logo, your name, a short bio, buttons to the forms and links you pick, and icons for your social profiles. Think of it as a link in bio page, built from your own forms and dressed in your brand kit.

A workspace can have up to **20 pages**, each with its own address and its own QR code:

```
https://app.dforms.ai/{account code}              your main page
https://app.dforms.ai/{account code}/p/{address}  every other page
```

For example `https://app.dforms.ai/acme` and `https://app.dforms.ai/acme/p/expo-food-2026`. Anyone in the workspace can create, edit and delete pages. A page is off until someone publishes it: until then its address is a not found page.

**Good uses for them:**

* **One page per trade fair or event.** Print the page's QR code on a card, a banner or an NFC card at your booth. Visitors scan it and pick the form they need: book a demo, join the list, enter the raffle. Next year, duplicate the page and change what is new.
* **Your Instagram or TikTok bio.** Social profiles allow a single link. Give that profile its own page and list every form and page you want behind it.
* **One page per product line or country.** Each with its own forms, links, logo and colors, at its own address.
* **One link for all your forms.** Hand out your main page in your email signature or your WhatsApp profile instead of one link per form.

***

## Your pages

**Step 1:** Click your name at the bottom of the left menu to open the account menu, then choose **Public page** under **Account settings**.

<figure><img src="https://3835013762-files.gitbook.io/~/files/v0/b/gitbook-x-prod.appspot.com/o/spaces%2FCy5rSNtQmtqYCGzJlNEB%2Fuploads%2Fgit-blob-5afa6c6017b5162bf3dc1e93dc29c271abcd0faa%2Fforms-public-page-01-profile-menu.png?alt=media" alt="The account menu open above the profile button, with Public page highlighted under Account settings"><figcaption><p>The pages live in <strong>Account settings</strong>, <strong>Public page</strong>.</p></figcaption></figure>

You land on **Your workspace pages**, the list of every page in the workspace. **New page** sits at the top right, with how many pages you have, for example **4 of 20 pages**.

<figure><img src="https://3835013762-files.gitbook.io/~/files/v0/b/gitbook-x-prod.appspot.com/o/spaces%2FCy5rSNtQmtqYCGzJlNEB%2Fuploads%2Fgit-blob-cd790ecd7d62fe544fc05efffd7172c081888df3%2Fforms-public-page-10-list.png?alt=media" alt="Your workspace pages with four pages: Main page with the Main badge, Expo Food 2026, Instagram bio and Mexico. New page with 4 of 20 pages is highlighted, and so are the publish switch and the actions of the Expo Food 2026 row"><figcaption><p>Every page in one list. Each row has its publish switch and its actions.</p></figcaption></figure>

Each row shows:

* The page's **internal name** (your main page shows **Main page** until you name it), and the **Main** badge on your main page.
* Its address, for example `app.dforms.ai/acme/p/expo-food-2026`.
* How many buttons it holds and when it was last edited, for example **3 buttons · Edited Oct 26, 2026**.
* A switch that publishes or unpublishes the page right away: **Published** or **Not published**.

And these actions, from left to right:

| Action                    | What it does                                                                      |
| ------------------------- | --------------------------------------------------------------------------------- |
| **Edit**                  | Opens the page in the editor. Clicking the page name does the same.               |
| **Copy link**             | Puts the page's address on your clipboard.                                        |
| **QR code**               | Opens the page's QR code, ready to download.                                      |
| **Duplicate**             | Makes an unpublished copy of the page. See [Duplicate a page](#duplicate-a-page). |
| **Make main page** (star) | Moves this page to your workspace address. See [Your main page](#your-main-page). |
| **Delete** (trash)        | Deletes the page. See [Delete a page](#delete-a-page).                            |

Your main page has neither the star nor the trash icon: it is already the main one, and it cannot be deleted.

> **💡 Note:** The pages belong to the workspace, not to you. If you work in several workspaces, switch to the right one first: each workspace has its own pages at its own account code.

***

## Create a page

**Step 2:** Click **New page**. Fill in:

* **Internal name**: a name to tell your pages apart, for example *Expo 2026*. Visitors never see it.
* **Address**: the end of the page's link, after `/p/`. It fills itself from the name as you type (*Expo Food 2027* gives `expo-food-2027`), and you can change it. The full address shows underneath.

Then click **Create page**. The page is created unpublished and opens in the editor.

<figure><img src="https://3835013762-files.gitbook.io/~/files/v0/b/gitbook-x-prod.appspot.com/o/spaces%2FCy5rSNtQmtqYCGzJlNEB%2Fuploads%2Fgit-blob-da86627ccae78f0dcbfcbdb747447a3ad194a11a%2Fforms-public-page-11-new-page.png?alt=media" alt="The New page panel above the list, with Internal name Expo Food 2027, Address expo-food-2027, the full address app.dforms.ai/acme/p/expo-food-2027 underneath, and the Create page and Cancel buttons"><figcaption><p>A name for you, an address for your visitors.</p></figcaption></figure>

An address uses 3 to 30 lowercase letters, numbers or single hyphens, and starts and ends with a letter or a number. It must be unique among your pages, and a few words are reserved by dForms. If the address cannot be used, the panel tells you why, for example **Another of your pages already uses that address.**

A workspace holds up to 20 pages. At 20, **New page** turns off: delete a page to add another.

> **💡 Tip:** The first page of a workspace becomes its main page, at `app.dforms.ai/{account code}`.

***

## Edit a page

**Step 3:** Click **Edit** on a page. The editor is on the left and a **Preview** of the page, in a phone sized frame, is on the right. The preview is drawn by the same code as the public page, so it shows exactly what visitors will get, and it updates as you type. **All pages** at the top takes you back to the list.

<figure><img src="https://3835013762-files.gitbook.io/~/files/v0/b/gitbook-x-prod.appspot.com/o/spaces%2FCy5rSNtQmtqYCGzJlNEB%2Fuploads%2Fgit-blob-e9d2fbf5b3d7c58eb110d07b6386ecf1fc013b70%2Fforms-public-page-02-editor.png?alt=media" alt="The editor of the main page, with the Published switch highlighted, and the row with the page address app.dforms.ai/acme, Copy link, QR code and Open highlighted, and the Preview on the right"><figcaption><p>The <strong>Published</strong> switch, and the page address with <strong>Copy link</strong>, <strong>QR code</strong> and <strong>Open</strong>.</p></figcaption></figure>

**Step 4:** At the top of the form, check the page's **Internal name** and **Address**. The hint under **Address** shows the full link, for example *The page lives at app.dforms.ai/acme/p/ followed by this.* On your main page it reads *This is your main page: it opens at app.dforms.ai/acme.*

<figure><img src="https://3835013762-files.gitbook.io/~/files/v0/b/gitbook-x-prod.appspot.com/o/spaces%2FCy5rSNtQmtqYCGzJlNEB%2Fuploads%2Fgit-blob-cac950d969ea3cc77f13feb5e4e7182229cfbed8%2Fforms-public-page-12-page-settings.png?alt=media" alt="The editor of the Expo Food 2026 page, with the Internal name and Address fields highlighted, and the Make main page button highlighted next to Open"><figcaption><p>Each page has its own internal name and address. <strong>Make main page</strong> sits next to <strong>Open</strong>.</p></figcaption></figure>

> **⚠️ Note:** If you change the address of a page that is already shared, the old address keeps working: visitors who open it, or scan a QR code printed with it, land on the new one. A page remembers up to 50 old addresses.

### Set up the header

**Step 5:** Choose the picture at the top of the page under **Photo or logo**.

| Option                     | What it does                                                                                                                                                          |
| -------------------------- | --------------------------------------------------------------------------------------------------------------------------------------------------------------------- |
| **Use brand kit logo**     | The default. The page shows the logo of your [brand kit](https://docs.dapta.ai/dforms/design/brand-kit.md). If the brand kit has no logo, your initials show instead. |
| **Upload image**           | Pick a PNG, JPEG, WebP or GIF from your computer. It is cropped to a square and resized for you.                                                                      |
| **No logo**                | Shows the initials of the page name instead of a picture.                                                                                                             |
| **Or paste an image link** | Use an image that is already online. The link must start with `https://`.                                                                                             |

The same picture is used on the link preview when someone shares the page in a chat or on social media. Each page has its own, so a fair page can carry the fair's logo.

**Step 6:** Fill in **Name** and **Bio**.

* **Name** is the title visitors see on the page. Left empty, the page uses the name of your workspace.
* **Bio** is one or two lines under the name, up to 280 characters.

<figure><img src="https://3835013762-files.gitbook.io/~/files/v0/b/gitbook-x-prod.appspot.com/o/spaces%2FCy5rSNtQmtqYCGzJlNEB%2Fuploads%2Fgit-blob-9b01452f2e60c9a58014073ae89f94bcfb238bce%2Fforms-public-page-03-header.png?alt=media" alt="The Photo or logo row with Upload image, Use brand kit logo and No logo highlighted, followed by the Name and Bio fields"><figcaption><p><strong>Photo or logo</strong>, <strong>Name</strong> and <strong>Bio</strong> make up the top of the page.</p></figcaption></figure>

### Add your buttons

**Step 7:** Under **Buttons**, build the list of buttons the page shows. Forms and links live in the same list, so you can mix them in any order.

* **Add a form** opens a list of the forms in your workspace. Pick one and it is added at the end. Each form can be added once per page, and its button shows the form's public title.
* **Add a link** adds a row with a **Label** (the text on the button, for example *Our website*) and a **URL**, which must start with `https://`.
* The arrows on the left of each row (**Move up**, **Move down**) change the order. The page shows the buttons top to bottom in this same order.
* The trash icon (**Remove**) takes a button off the page. Removing a form button does not touch the form.

A page holds up to 30 buttons.

<figure><img src="https://3835013762-files.gitbook.io/~/files/v0/b/gitbook-x-prod.appspot.com/o/spaces%2FCy5rSNtQmtqYCGzJlNEB%2Fuploads%2Fgit-blob-f39232e089ed49c7fcb589ddda16a95f55562837%2Fforms-public-page-04-buttons.png?alt=media" alt="The Buttons list with three forms and two links, the Move up and Move down arrows of one row highlighted, and the Add a form and Add a link controls highlighted below the list"><figcaption><p>Forms and links in one ordered list. Use the arrows to reorder and the controls below to add more.</p></figcaption></figure>

On the page, a form button opens the form in the same tab. A link button opens in a new tab.

> **⚠️ Note:** If a form on a page is deleted, its button drops off every page by itself. A page never shows a broken button, and there is nothing to clean up.

### Add your social profiles

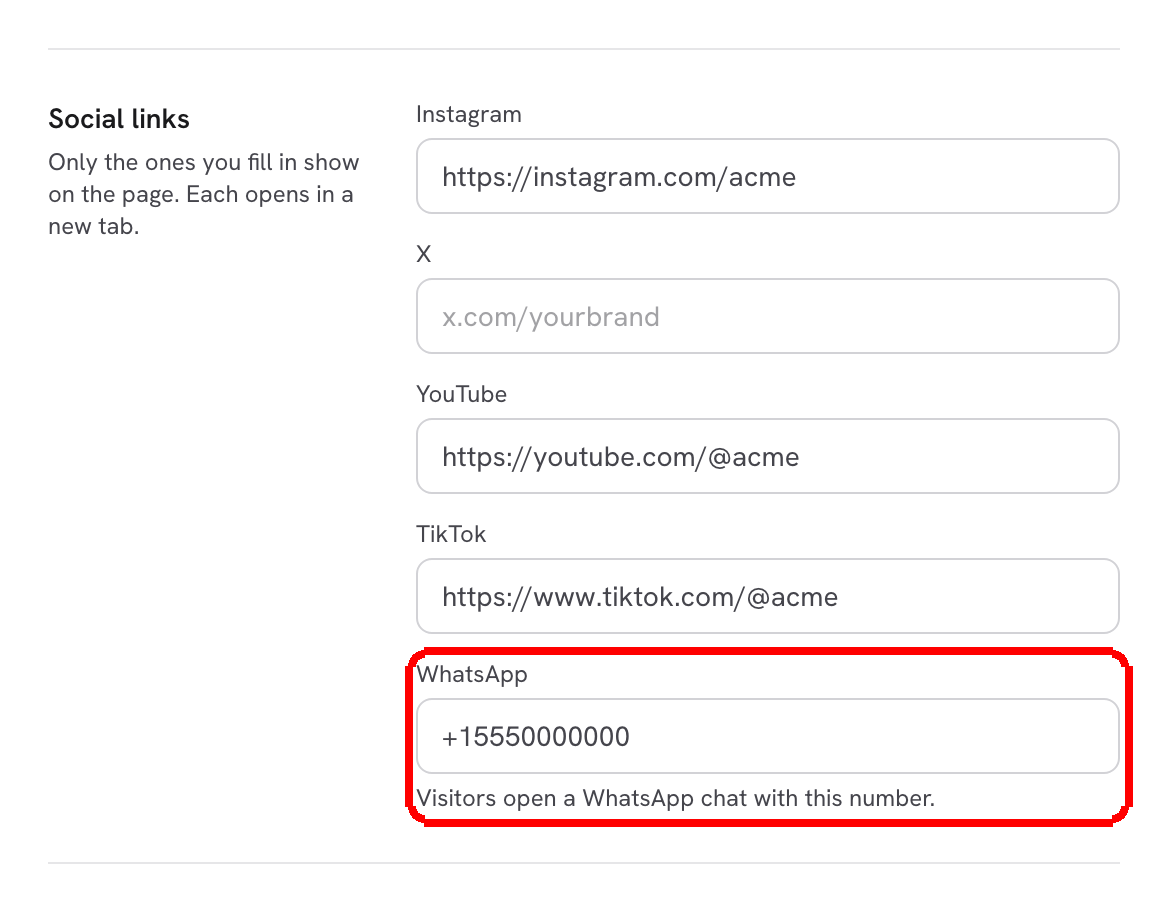
**Step 8:** Under **Social links**, fill in the networks you use: **Instagram**, **X**, **YouTube**, **TikTok** and **WhatsApp**. Only the ones you fill in show on the page, as a row of icons under your bio, and each opens in a new tab.

* For **Instagram**, **X**, **YouTube** and **TikTok**, paste your profile link (`instagram.com/yourbrand`) or just your handle (`@yourbrand`). When you leave the field, it turns into the full link that will be saved.
* For **WhatsApp**, type your phone number **with the country code**, starting with `+`, for example `+57 300 123 4567`. Visitors who tap the icon open a WhatsApp chat with that number (a `wa.me` link). No WhatsApp Business setup is needed.

<figure><img src="https://3835013762-files.gitbook.io/~/files/v0/b/gitbook-x-prod.appspot.com/o/spaces%2FCy5rSNtQmtqYCGzJlNEB%2Fuploads%2Fgit-blob-a29c3ddc5a1a28a75cb5d1f9b24e6e61380550b3%2Fforms-public-page-05-socials.png?alt=media" alt="The Social links section with Instagram, X, YouTube, TikTok and WhatsApp fields, and the WhatsApp field highlighted with its hint Visitors open a WhatsApp chat with this number"><figcaption><p>Leave a network empty and its icon does not show. WhatsApp takes a phone number with its country code.</p></figcaption></figure>

> **💡 Tip:** If a value is not recognized, the field turns red and tells you what it expects, for example *Add the country code at the start, with a +, like +57 300 123 4567.*

### Pick the page's colors

**Step 9:** Under **Colors**, choose this page's **Buttons**, **Background** and **Text** colors. By default a page uses your brand kit, and each color says **From your brand kit**. Pick a color to use another one on this page only; **Use brand kit** next to it puts the brand kit's color back.

<figure><img src="https://3835013762-files.gitbook.io/~/files/v0/b/gitbook-x-prod.appspot.com/o/spaces%2FCy5rSNtQmtqYCGzJlNEB%2Fuploads%2Fgit-blob-d788ae01fa3d92acd018c941fd572d593e17b59f%2Fforms-public-page-13-colors.png?alt=media" alt="The Colors section with Buttons, Background and Text color pickers set to orange, cream and near black, each with Use brand kit next to it, and the Preview on the right showing orange buttons on a cream background"><figcaption><p>A fair page in the fair's colors. The rest of your pages keep the brand kit.</p></figcaption></figure>

***

## Publish and share

**Step 10:** Click **Save**. The message **Page saved.** confirms it.

**Step 11:** Turn the **Published** switch on (top right). The switch saves the page too. From now on the address is live, and an **Open** link next to **QR code** takes you to it. The switch in the list does the same.

To take a page down, turn **Published** off. Visitors get a page not found on that page's address only, and everything you set up is kept for when you turn it back on.

**Step 12:** Share it. The row under the title gives you three ways:

* **Copy link** puts the page's address on your clipboard.
* **QR code** opens the page's QR code with **Download SVG** and **Download PNG**. Use the SVG for print: it stays sharp at any size. Every page has its own QR code.
* **Open** shows the live page in a new tab.

<figure><img src="https://3835013762-files.gitbook.io/~/files/v0/b/gitbook-x-prod.appspot.com/o/spaces%2FCy5rSNtQmtqYCGzJlNEB%2Fuploads%2Fgit-blob-5661da4e1a3c5a68bf01be8caddcf211746a8703%2Fforms-public-page-06-qr.png?alt=media" alt="The QR code for your page dialog with the QR code, the page address https://app.dforms.ai/acme and the Download SVG and Download PNG buttons highlighted"><figcaption><p>Scanning the code opens that page. Print it on cards, banners or your booth.</p></figcaption></figure>

While your main page is published, **Home** also shows its link at the top, with **Copy** and **Open**, so it is always at hand.

***

## Duplicate a page

The quickest way to prepare the page for the next fair is to copy the last one. Click **Duplicate** (the stacked squares icon) on a page in the list. The message **Page duplicated. The copy is not published yet.** confirms it.

The copy has everything the original had: buttons, social links, logo and colors. Its internal name ends in **(copy)** and its address gets a number, for example `expo-food-2026-2`. It stays unpublished until you edit it and turn it on, so nothing new goes live by accident.

<figure><img src="https://3835013762-files.gitbook.io/~/files/v0/b/gitbook-x-prod.appspot.com/o/spaces%2FCy5rSNtQmtqYCGzJlNEB%2Fuploads%2Fgit-blob-0b94912fe23606f693169a2b8bd788f8802524fa%2Fforms-public-page-14-duplicate.png?alt=media" alt="The list after duplicating Expo Food 2026: the Duplicate icon of that row highlighted, a new row Expo Food 2026 (copy) at app.dforms.ai/acme/p/expo-food-2026-2, Not published, highlighted, and the message Page duplicated. The copy is not published yet."><figcaption><p>The copy lands at the end of the list, unpublished.</p></figcaption></figure>

***

## Your main page

One page is your **main page**. It opens at your workspace address, `app.dforms.ai/{account code}`, and it is the one **Home** shows. Pages made before there could be several are main pages.

To make another page the main one, click its star (**Make main page**) in the list, or **Make main page** in its editor. The message **This is now your main page.** confirms it. The page that was main until then keeps working at its own `/p/` address.

Only a published page can be the main one, since your workspace address must always open something. On a page that is not published, the star is off and says why:

<figure><img src="https://3835013762-files.gitbook.io/~/files/v0/b/gitbook-x-prod.appspot.com/o/spaces%2FCy5rSNtQmtqYCGzJlNEB%2Fuploads%2Fgit-blob-d1769c307b3dd4a9d79628f22392a0ecabcc0943%2Fforms-public-page-15-main-needs-publish.png?alt=media" alt="The Mexico row, Not published, with its star turned off and the tooltip Publish this page first. Your main page opens at your workspace link, so it has to be published. highlighted"><figcaption><p>Publish the page first, then make it your main page.</p></figcaption></figure>

***

## Delete a page

Click the trash icon (**Delete**) on a page in the list and confirm with **Delete page**. The page and its address stop working, printed QR codes included. This cannot be undone.

Your main page cannot be deleted. To delete it, make another page the main one first.

***

## What visitors see

A page uses your [brand kit](https://docs.dapta.ai/dforms/design/brand-kit.md): its colors, typeface, corner style and button style, the same way your forms do, except for the colors you set on that page. A visitor who moves from the page into a form does not feel a jump.

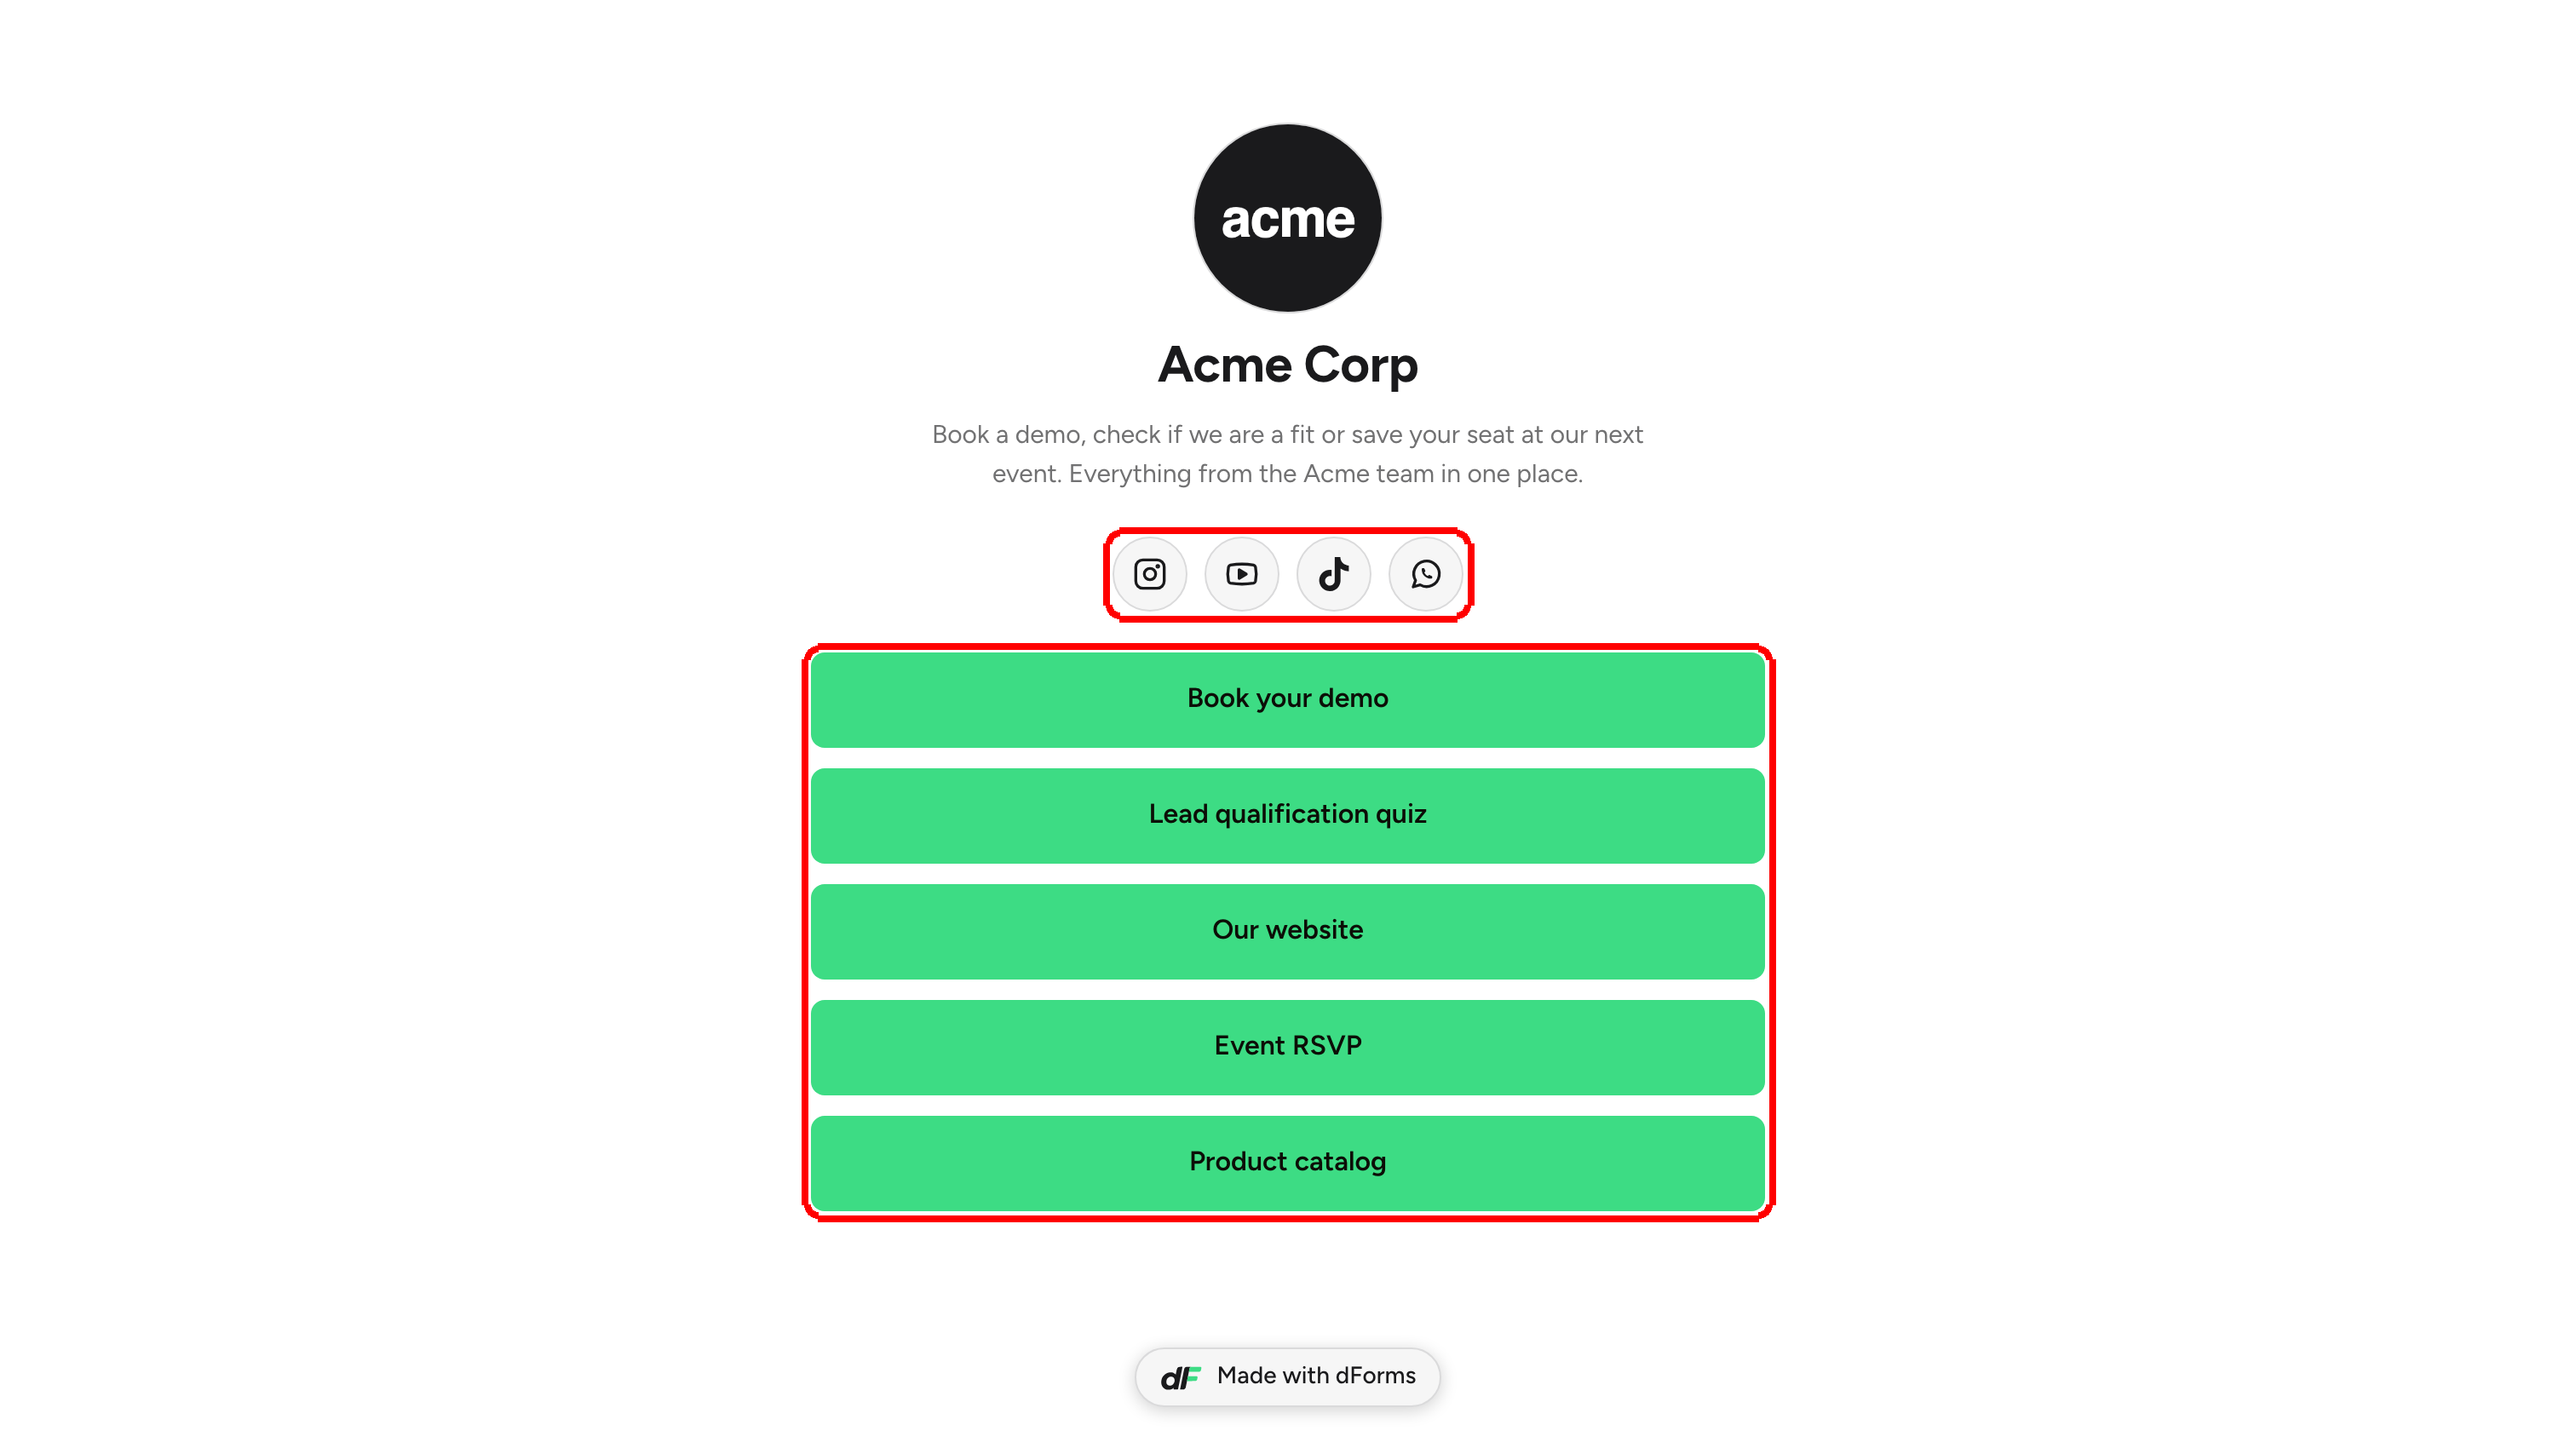
<figure><img src="https://3835013762-files.gitbook.io/~/files/v0/b/gitbook-x-prod.appspot.com/o/spaces%2FCy5rSNtQmtqYCGzJlNEB%2Fuploads%2Fgit-blob-2f8fb297d123ce968b578e2daa229f45b393ea73%2Fforms-public-page-07-live.png?alt=media" alt="The live workspace page on a computer: the Acme logo, the name Acme Corp, the bio, a row of Instagram, YouTube, TikTok and WhatsApp icons highlighted, and five buttons highlighted"><figcaption><p>The live page: logo, name and bio, then your social icons and your buttons, in the order you set.</p></figcaption></figure>

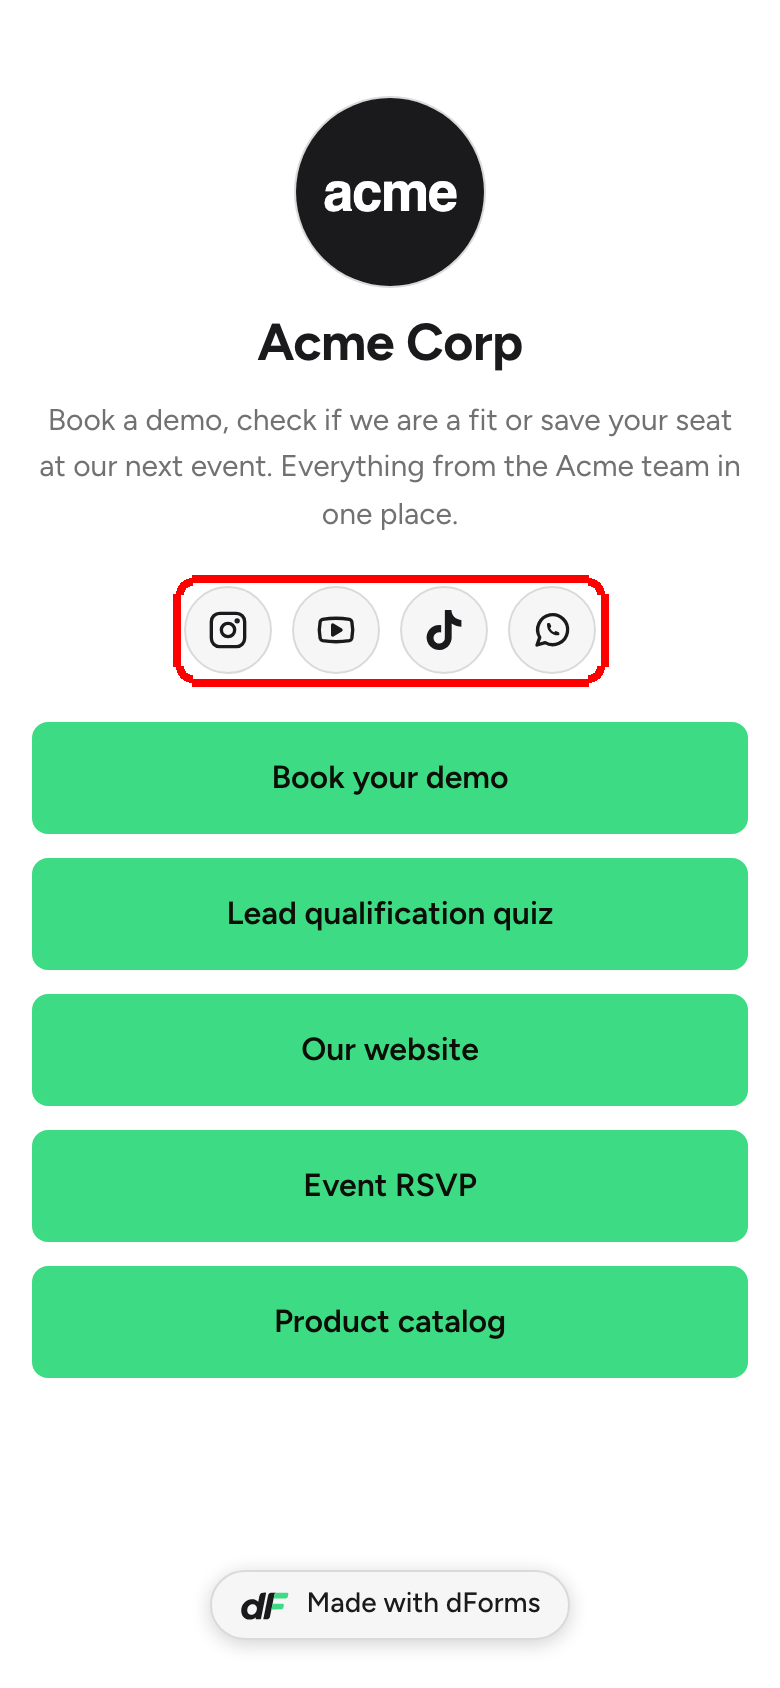
Most visitors arrive from a phone, so every page is built for it first: one column of large buttons that fits a small screen, whether the page has one button or many.

<figure><img src="https://3835013762-files.gitbook.io/~/files/v0/b/gitbook-x-prod.appspot.com/o/spaces%2FCy5rSNtQmtqYCGzJlNEB%2Fuploads%2Fgit-blob-ec7353cc96d0637c4a140f2b740f2cb88d61bcd2%2Fforms-public-page-16-page-phone.png?alt=media" alt="The Expo Food 2026 page at app.dforms.ai/acme/p/expo-food-2026 on a phone, with its own name and bio, a cream background and three orange buttons highlighted"><figcaption><p>A <code>/p/</code> page on a phone, in its own colors.</p></figcaption></figure>

<figure><img src="https://3835013762-files.gitbook.io/~/files/v0/b/gitbook-x-prod.appspot.com/o/spaces%2FCy5rSNtQmtqYCGzJlNEB%2Fuploads%2Fgit-blob-28bdf8c3b6f45209bfa0766c438e7654e9965d94%2Fforms-public-page-09-phone.png?alt=media" alt="The main workspace page on a phone, with the social icons highlighted, the buttons in one column and the Made with dForms badge at the bottom"><figcaption><p>The main page on a phone, in the brand kit colors.</p></figcaption></figure>

* The fixed words on the page (such as the badge at the bottom) follow the visitor's browser language. Add `?lang=en` or `?lang=es` to the link to force one. Your name, bio and button labels show exactly as you wrote them.
* When a page is shared in a chat or on social media, the preview card shows that page's picture, name and bio.

### The Made with dForms badge

At the bottom of every page sits the **Made with dForms** badge (**Hecho con dForms** in Spanish), the same one your forms carry. It opens the dForms website in a new tab.

<figure><img src="https://3835013762-files.gitbook.io/~/files/v0/b/gitbook-x-prod.appspot.com/o/spaces%2FCy5rSNtQmtqYCGzJlNEB%2Fuploads%2Fgit-blob-17ca27ecd7f303ed593f1380942993aa82cd8217%2Fforms-public-page-08-badge.png?alt=media" alt="The bottom of the workspace page with the Made with dForms badge highlighted under the last button"><figcaption><p>The badge sits under the last button.</p></figcaption></figure>

***

## For developers and AI agents

Pages can also be managed with an [API key you already have](https://docs.dapta.ai/dforms/developers/api-keys.md) or through the [MCP connector](https://docs.dapta.ai/dforms/developers/mcp-connector.md).

| Endpoint                                 | What it does                                                                                                                                                  |
| ---------------------------------------- | ------------------------------------------------------------------------------------------------------------------------------------------------------------- |
| `GET /v1/link-pages`                     | Every page of the workspace, the main one first, with its `id`, `slug`, `name`, whether it is the default and `live`, its button count and its `publicUrl`.   |
| `POST /v1/link-pages`                    | Adds a page (up to 20). Without a `slug`, one is made from the name; without a `page`, it starts empty and unpublished.                                       |
| `GET /v1/link-pages/{id}`                | One page, with the workspace's forms and brand kit.                                                                                                           |
| `PUT /v1/link-pages/{id}`                | Changes a page: only the fields sent change. A new `slug` keeps the old address redirecting; `isDefault: true` makes it the main page (published pages only). |
| `POST /v1/link-pages/{id}/duplicate`     | Copies a page under a new slug, unpublished.                                                                                                                  |
| `DELETE /v1/link-pages/{id}`             | Deletes a page. The main page answers `409` `DEFAULT_PAGE`.                                                                                                   |
| `GET /v1/link-page`, `PUT /v1/link-page` | Keep working as before, on the main page.                                                                                                                     |

A page's own colors go in `page.colors` as `primaryColor`, `background` and `foreground`, in hex; an absent one takes the brand kit's. The published pages can also be read without a key: see [Public API](https://docs.dapta.ai/dforms/developers/public-api.md).

With the MCP connector, your agent uses `list_link_pages`, `create_link_page`, `duplicate_link_page` and `delete_link_page`, and `get_link_page` and `update_link_page` take an optional `page_id` (the main page when absent). Ask in your own words, for example *Copy my Expo page for next year's fair*.

***

## Links you shared before

Your main page keeps the address the workspace page always had, so everything already printed or shared keeps working. Before the workspace page existed, each member could publish a personal page at `app.dforms.ai/{account code}/{handle}`. Those addresses still work: they take visitors to your main page. Form links (`app.dforms.ai/{account code}/f/{form slug}`) are not affected.

***

## What's next

* [Share with a QR code](https://docs.dapta.ai/dforms/share/qr-code.md): a QR code for a single form instead of a whole page.
* [Your public link](https://docs.dapta.ai/dforms/share/public-link.md): the address of a single form, and how the slug is built.
* [Brand kit](https://docs.dapta.ai/dforms/design/brand-kit.md): the logo, colors and typeface the pages borrow.
* [Public page settings](https://docs.dapta.ai/dforms/account/public-page-and-identity.md): where your pages sit among the account settings.


---

# Agent Instructions
This documentation is published with GitBook. GitBook is the documentation platform designed so that both humans and AI agents can read, navigate, and reason over technical content effectively. Learn more at gitbook.com.

## Querying This Documentation
If you need additional information that is not directly available in this page, you can query the documentation by asking a question.

Perform an HTTP GET request on the following URL with the `ask` and `goal` query parameters:

```
GET https://docs.dapta.ai/dforms/share/public-page.md?ask=<question>&goal=<user_goal>
```

`ask` is the immediate question: it should be specific, self-contained, and written in natural language.
`goal` is what the user is ultimately trying to achieve, the reason they need the answer. Sharing it helps GitBook give you a better, more relevant answer. A goal is most helpful when it describes the outcome the user wants rather than restating the question. For example, with `ask=how do I create an API token`, a goal like `automate deployments from our CI pipeline` lets GitBook tailor the answer to that use case.

The response will contain a direct answer to the question and relevant excerpts and sources from the documentation.

Use this mechanism when the answer is not explicitly present in the current page, you need clarification or additional context, or you want to retrieve related documentation sections.